Blog

  • ResNet50-PYNQ

    🚫 This repository has been archived. For up-to-date ResNet50 dataflow FPGA acceleration, please see FINN Examples.

    Quantized ResNet50 Dataflow Acceleration on Alveo

    This repository contains an implementations of a binary ResNet50 FINN-style dataflow accelerator targeting Alveo boards.
    It is intended as a showcase of achievable throughput and latency for ImageNet clasiffication on FPGA, using dataflow execution and on-chip weight storage.

    Repo organization

    The repository is organized as follows:

    • src: contains source code and submodules
      • hls: HLS custom building blocks and submodules to FINN librares (FINN and FINN-HLSLib)
      • w1a2-v1.0: pre-build weights, thresholds, directives and configuration files for Binary ResNet50
    • compile: contains scripts for accelerator compilation (Vivado HLS CSynth + Vivado Synthesis)
    • link: contains scripts for accelerator linking into the Alveo platform with Vitis
    • host: python and Jupyter host code, using PYNQ for Alveo

    Building the Accelerator

    The Accelerator is built using Vitis 2019.2. We recommend using this version,
    otherwise changes might be required to source and/or Makefiles for things to
    work.

    To build the accelerator, clone the repository (using --recursive to pull submodules), after which:

    cd ResNet50-PYNQ/compile
    make NET=w1a2_v1.0
    cd ../link
    make

    See the specific Compile and Link documentation for further info.

    Running the Demo

    After you have built the accelerator, you can install the required files in
    the host folder. Move in the cloned repo and do make install

    cd ResNet50-PYNQ
    make install

    You can then run the included Jupyter notebook or the Python multithreaded inference example. If you
    want to use the distributed PYNQ python package, please read below.
    If you want to run example Python inference code, please see the host code documentation.

    PYNQ quick start

    Install the resnet50-pynq package using pip:

    pip install resnet50-pynq

    After the package is installed, to get your own copy of the available notebooks
    run:

    pynq get-notebooks ResNet50

    You can then try things out by doing:

    cd pynq-notebooks
    jupyter notebook

    There are a number of additional options for the pynq get-notebooks command,
    you can list them by typing

    pynq get-notebooks --help

    You can also refer to the official
    PYNQ documentation for more information
    regarding the PYNQ Command Line Interface and in particular the
    get-notebooks command.

    Supported Boards/Shells

    Currently, we distribute the overlay only for the following Alveo boards and
    shells:

    Shell Board
    xilinx_u250_xdma_201830_2 Xilinx Alveo U250

    Designs are built using Vitis 2019.2.

    Author

    Lucian Petrica @ Xilinx Research Labs.

    Visit original content creator repository
    https://github.com/Xilinx/ResNet50-PYNQ

  • QtVTT

    QtVTT

    Qt Virtual Table Top

    Virtual Table Top written in Python and Qt

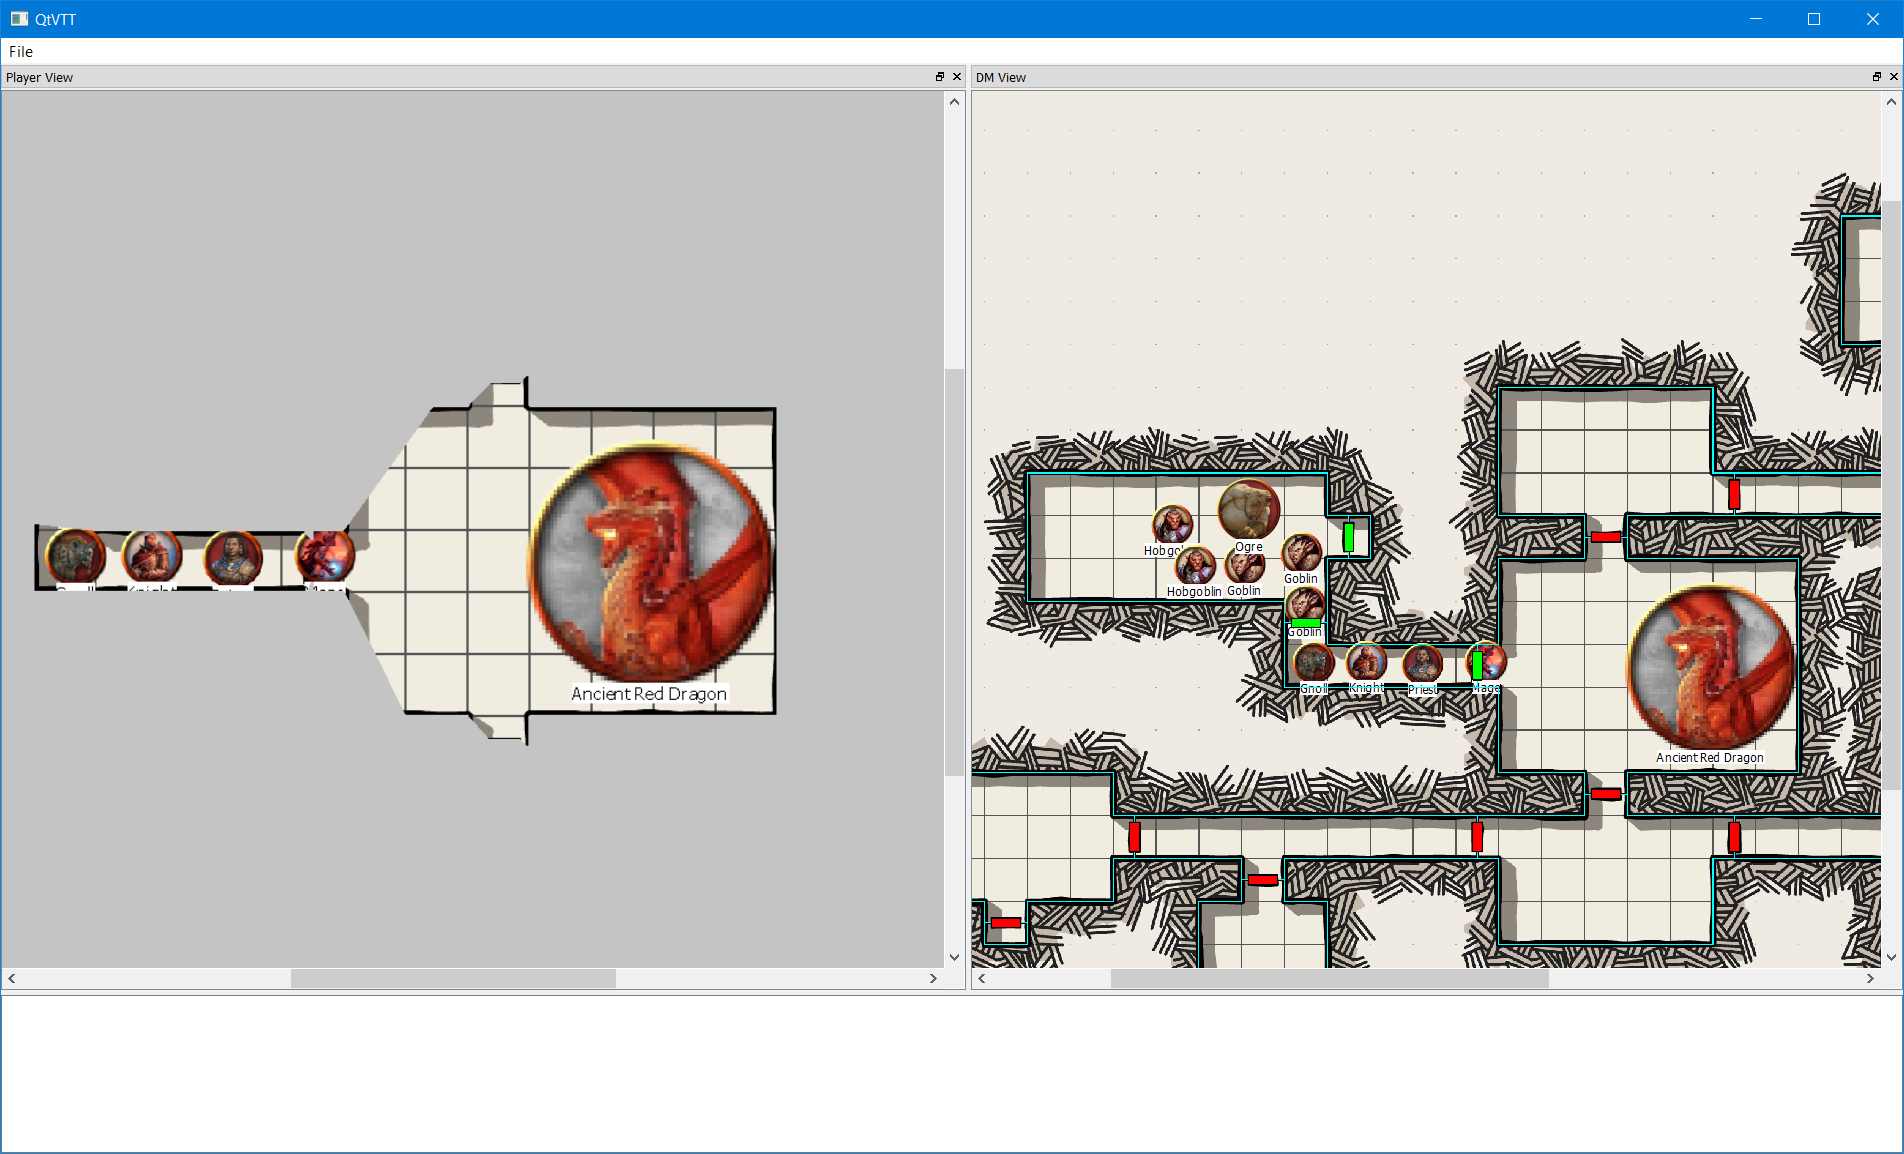
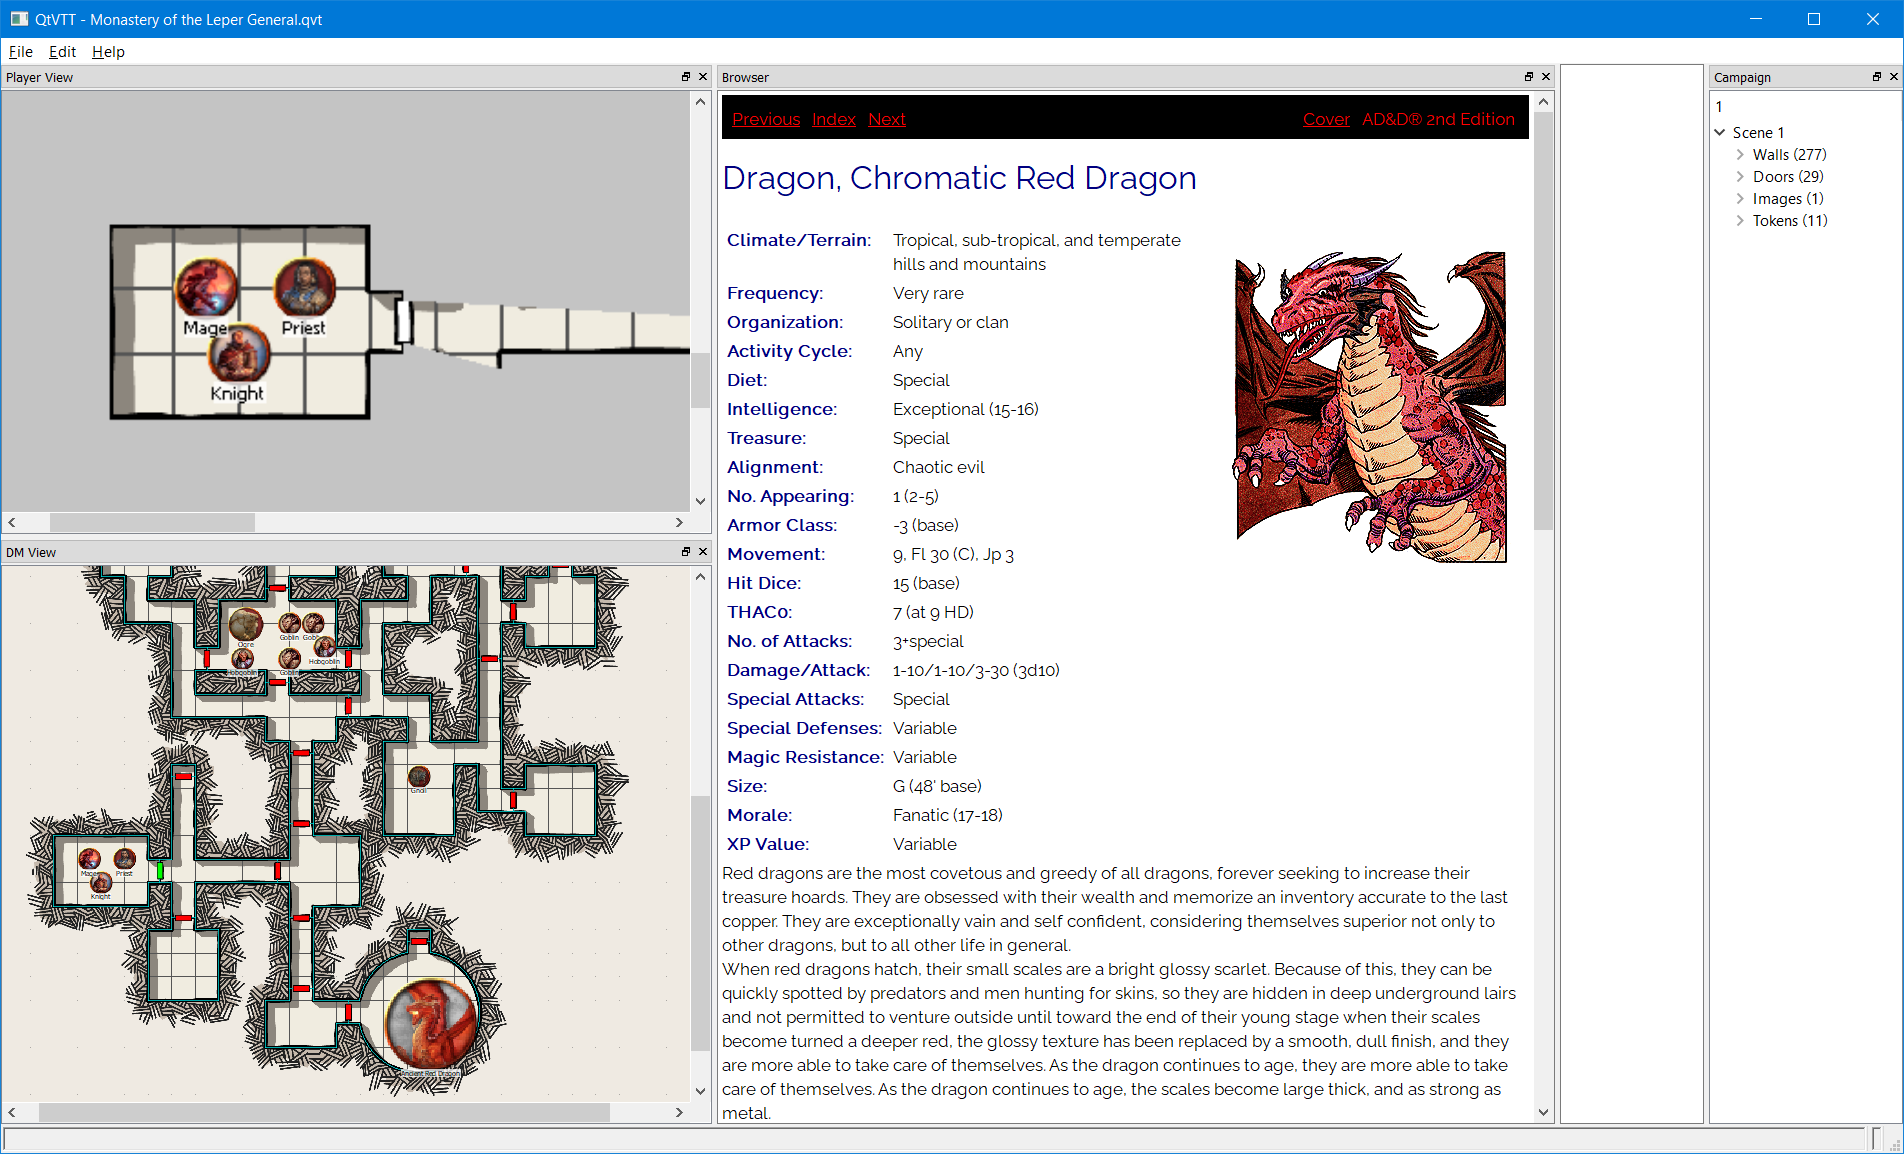
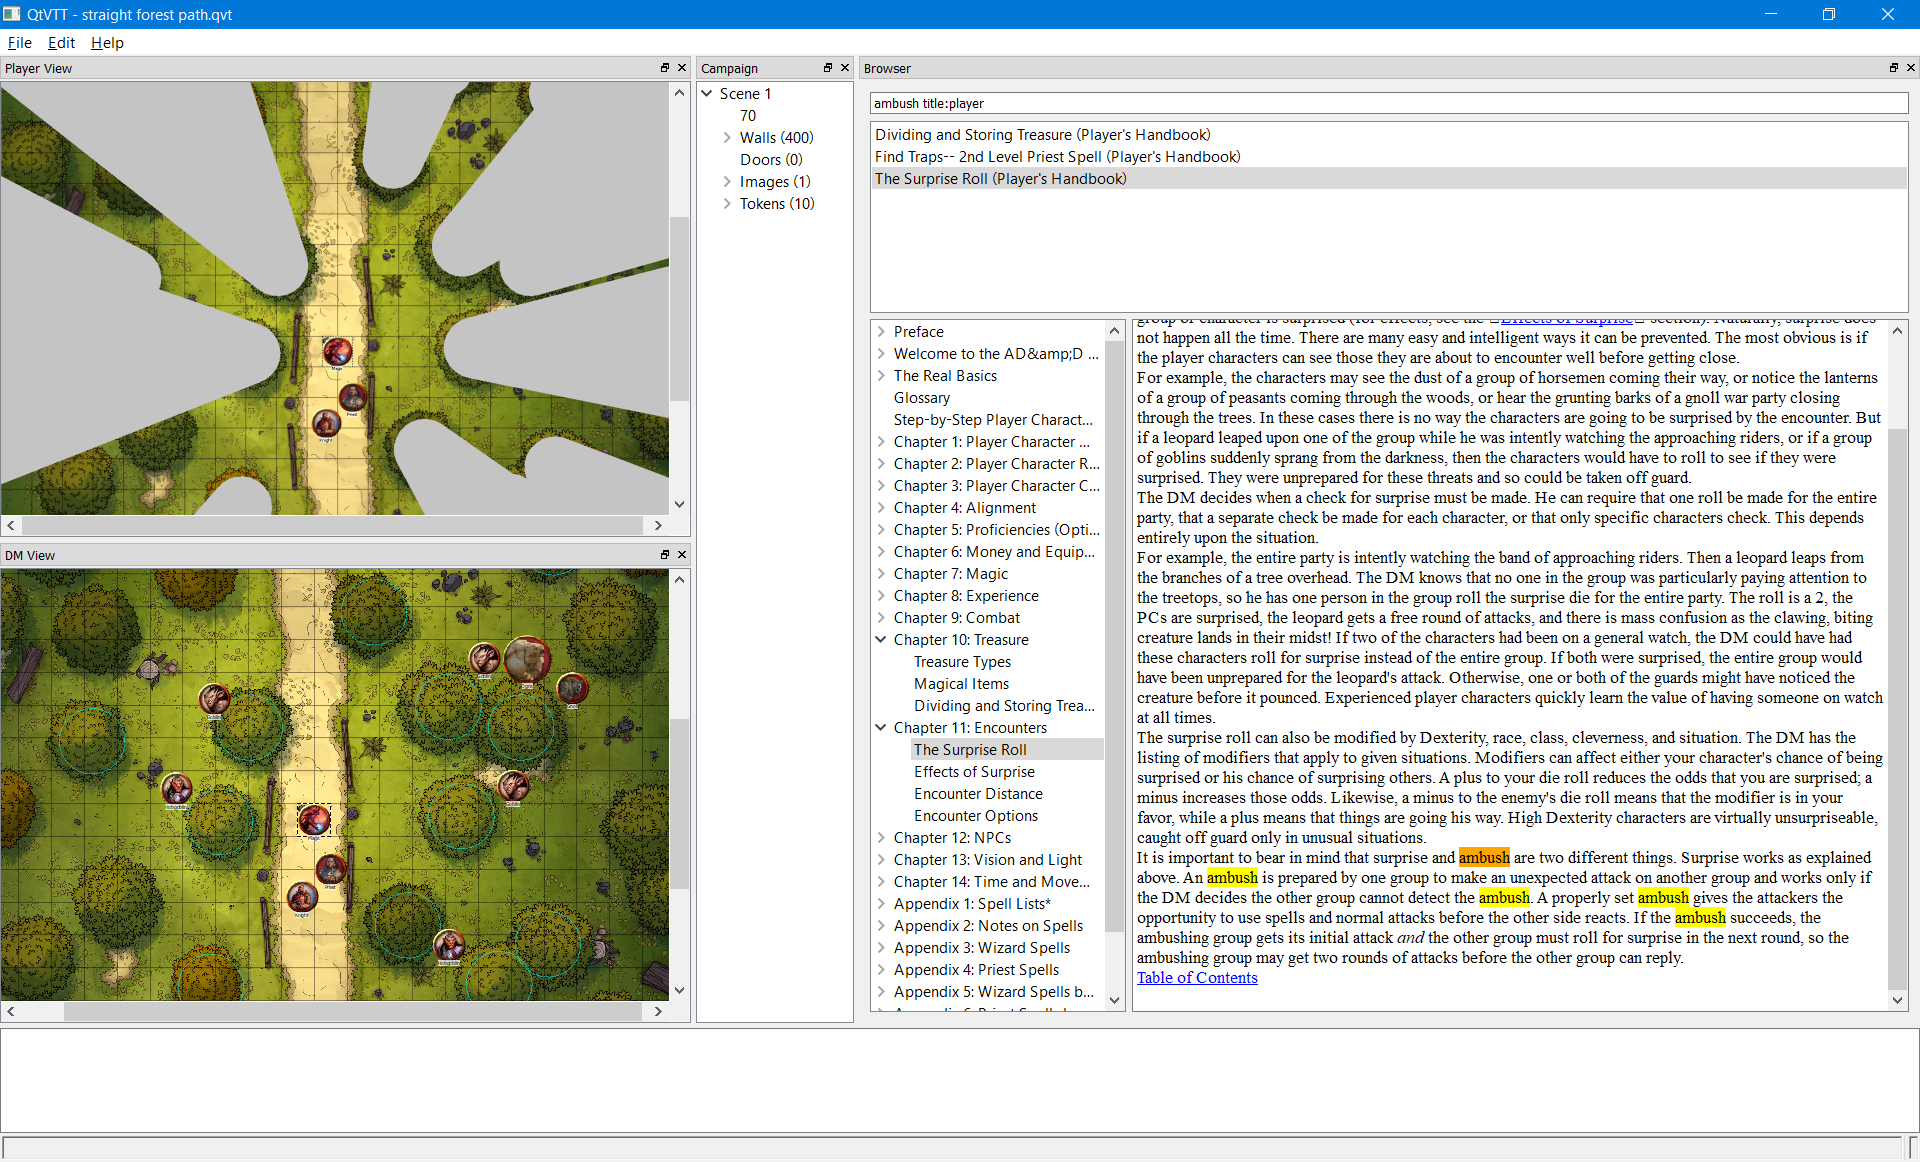
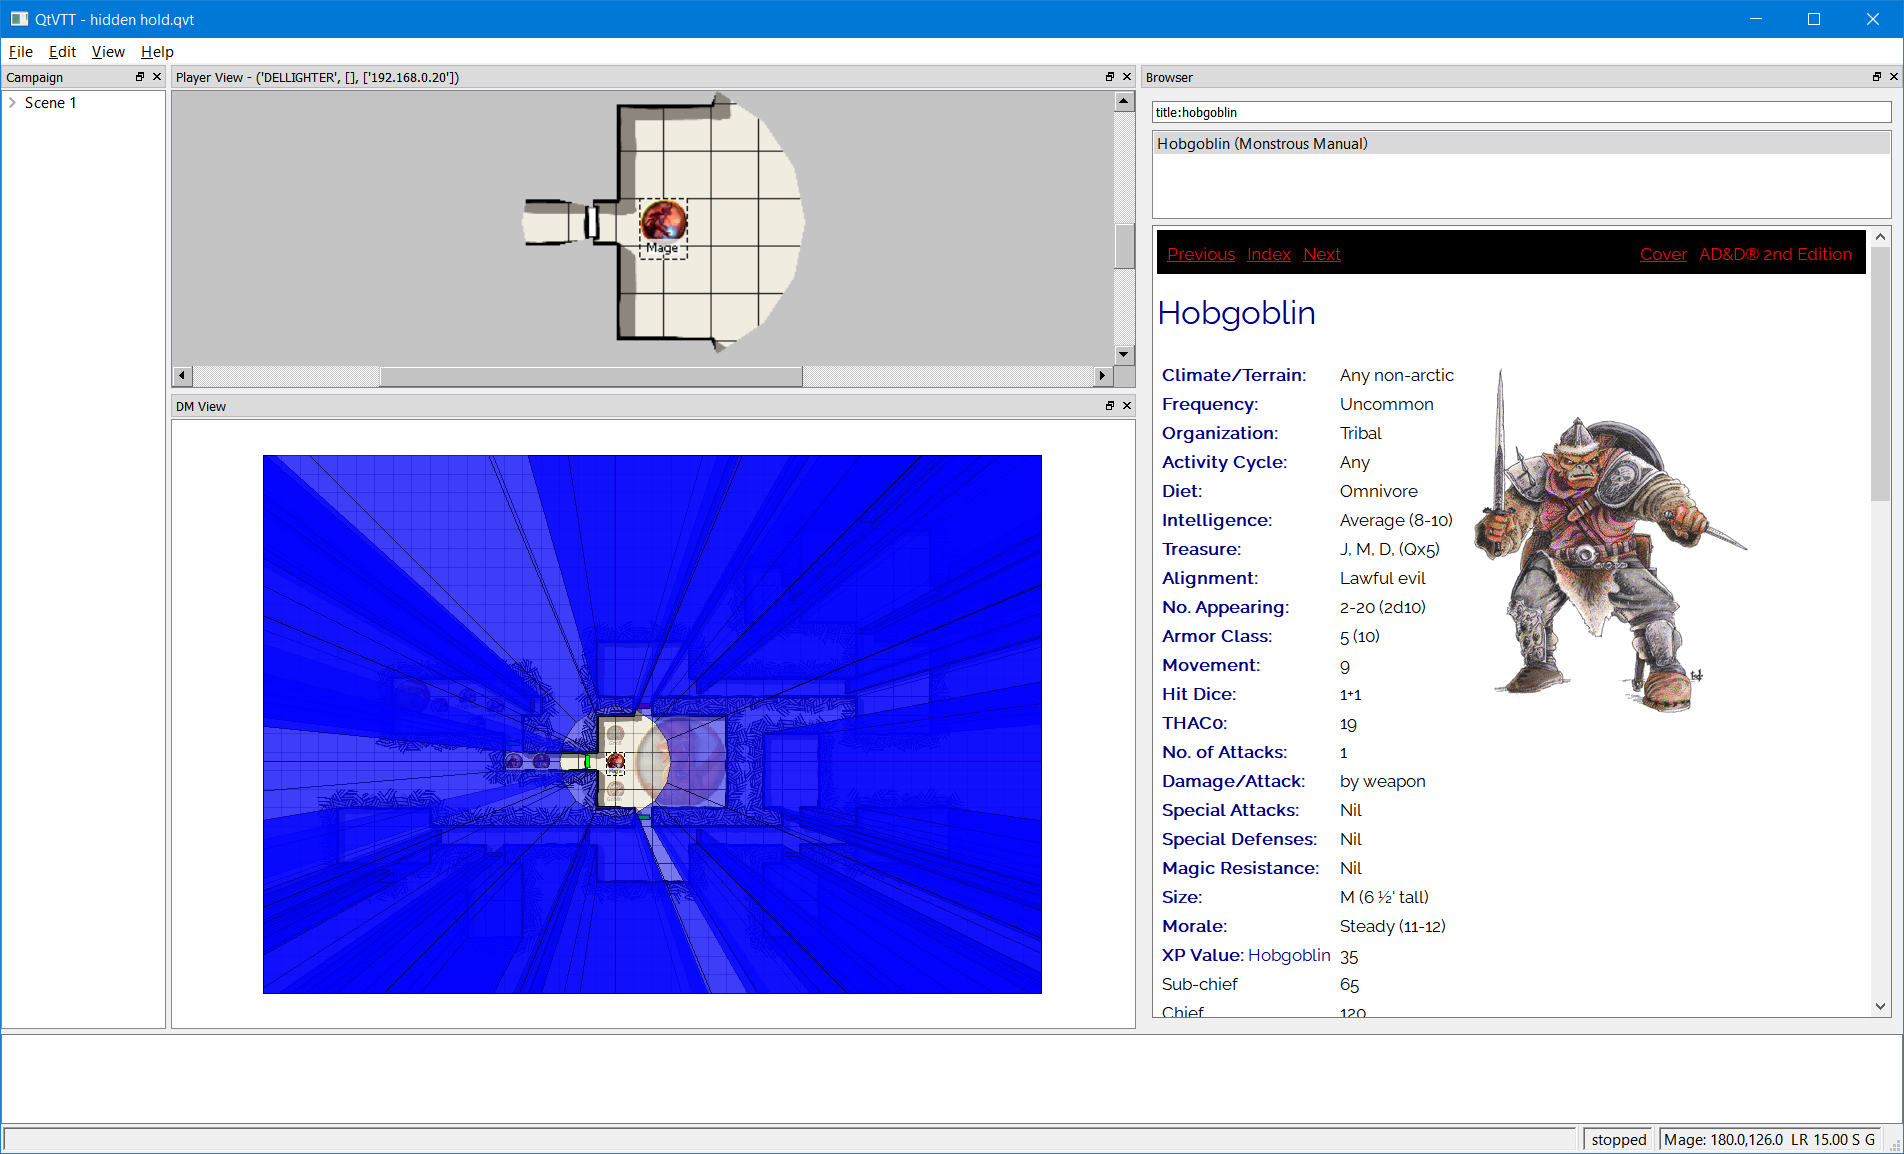
    Screenshots

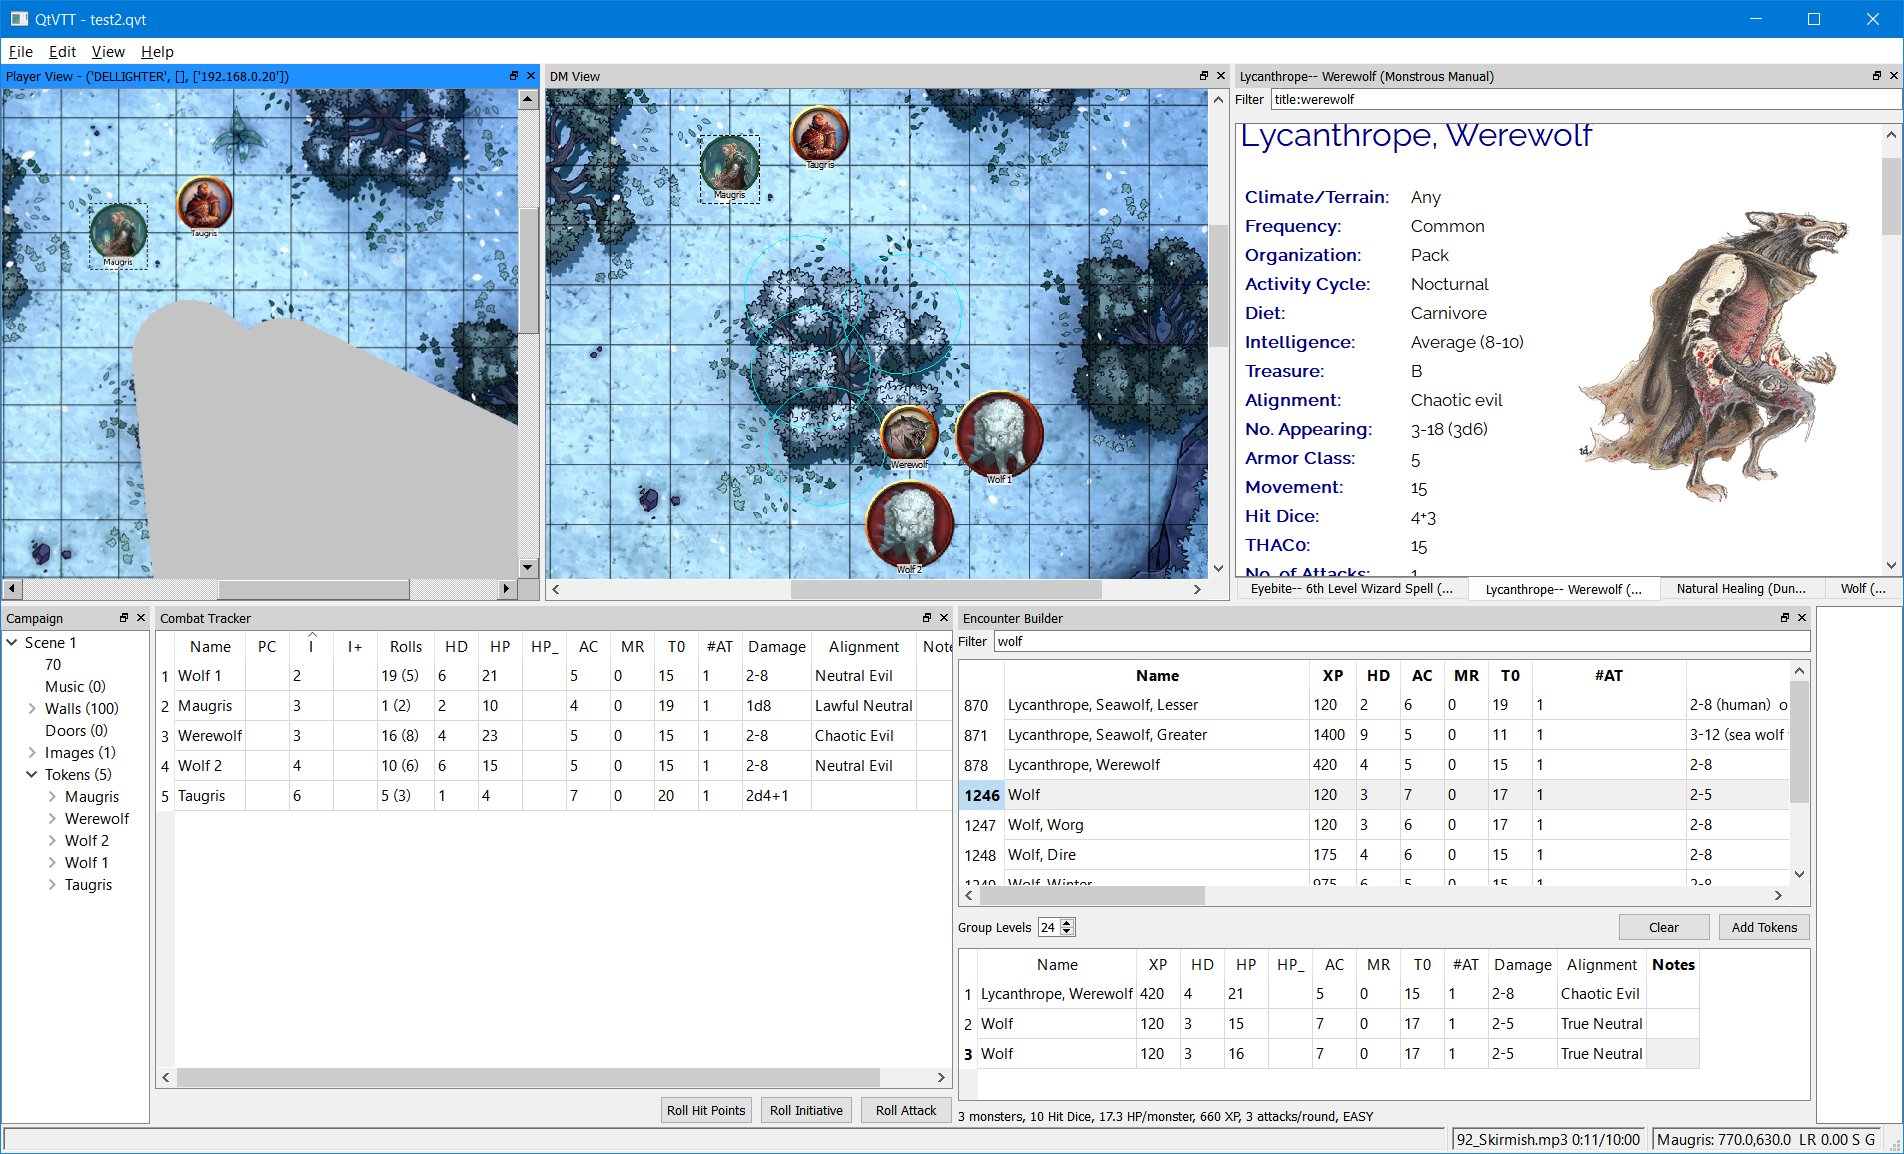
    Out of the frying pan into the fire

    image

    Player View, DM View, Browser, and Tree

    image

    Documentation browser with TOC, term filter and search, circular walls

    image

    Clipped fog polygons, light range, hidden tokens

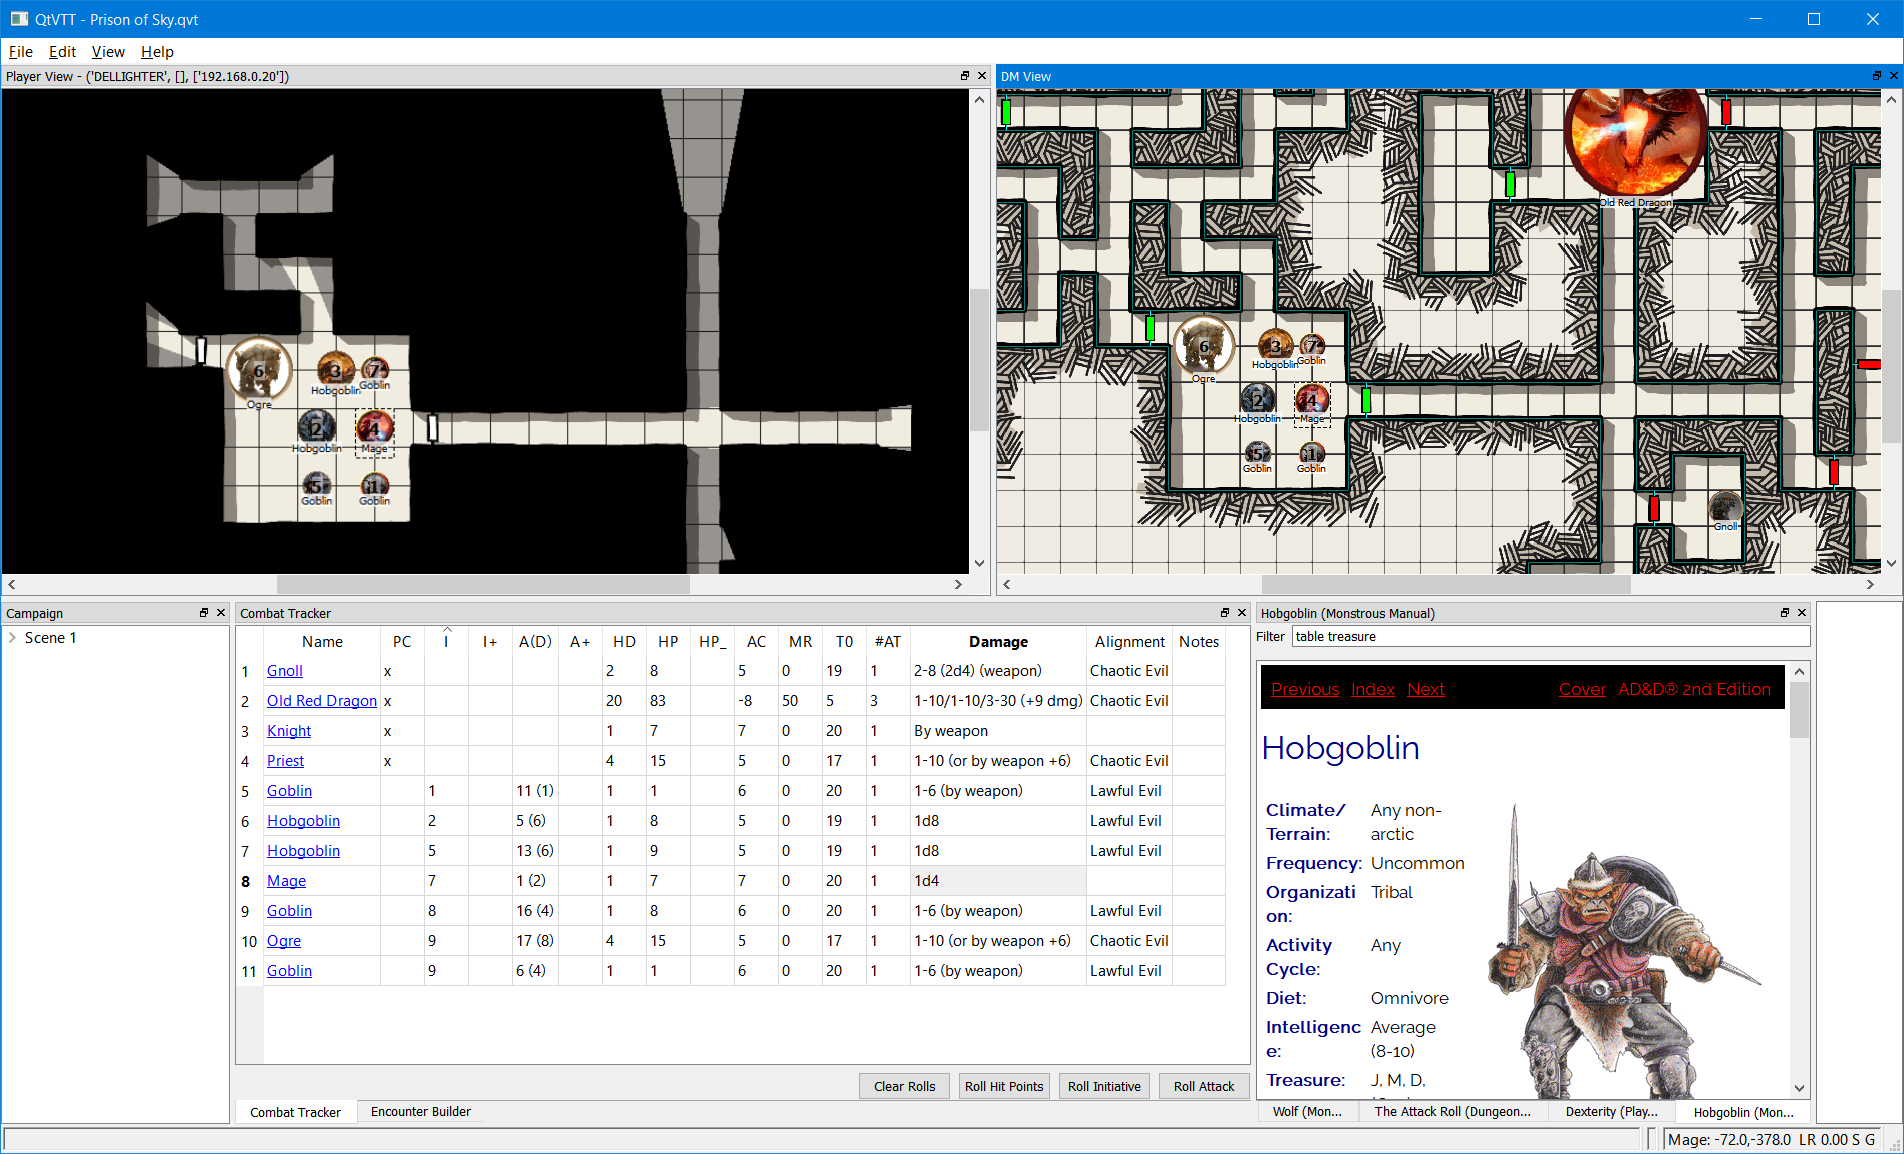
    image

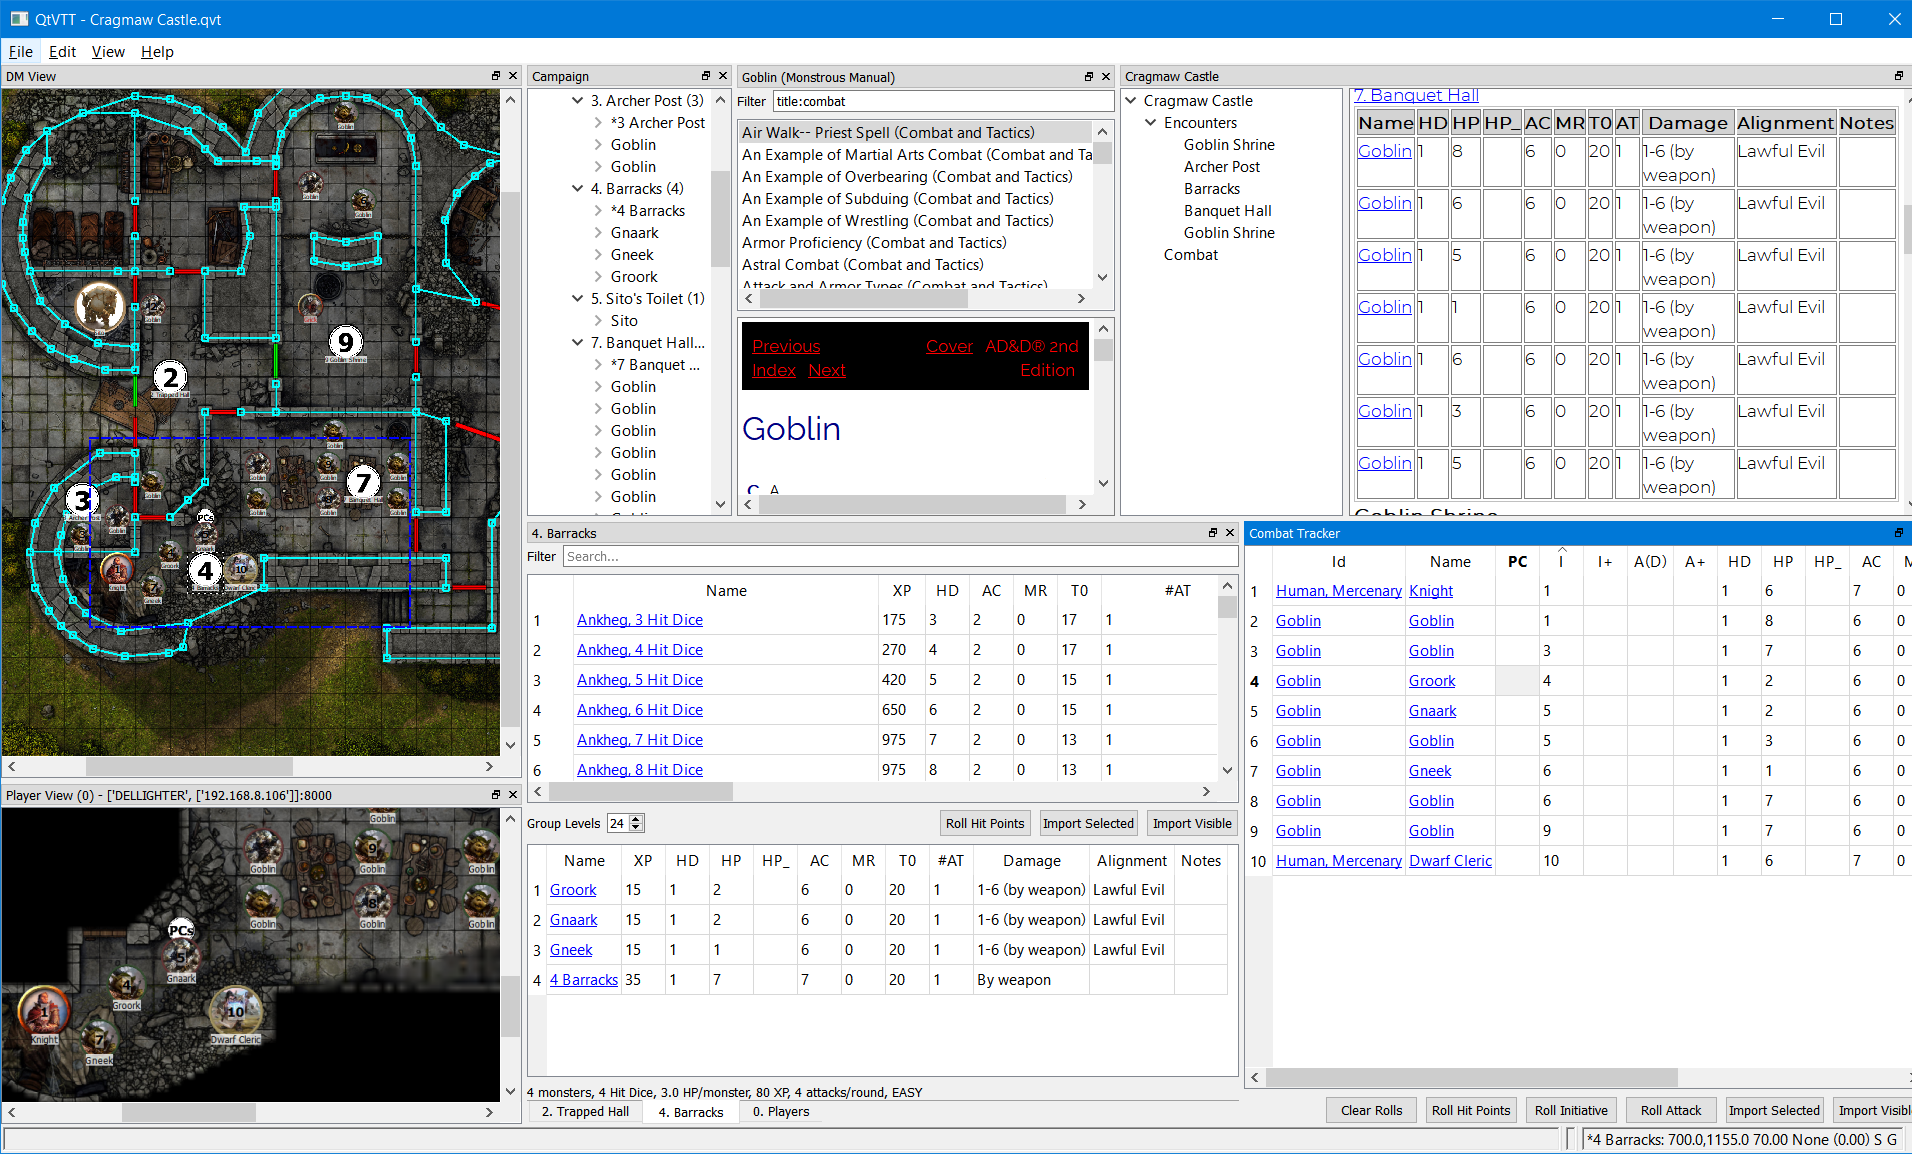
    Documentation browsing, combat tracker, encounter builder

    image

    Fog of war, display token initiative order

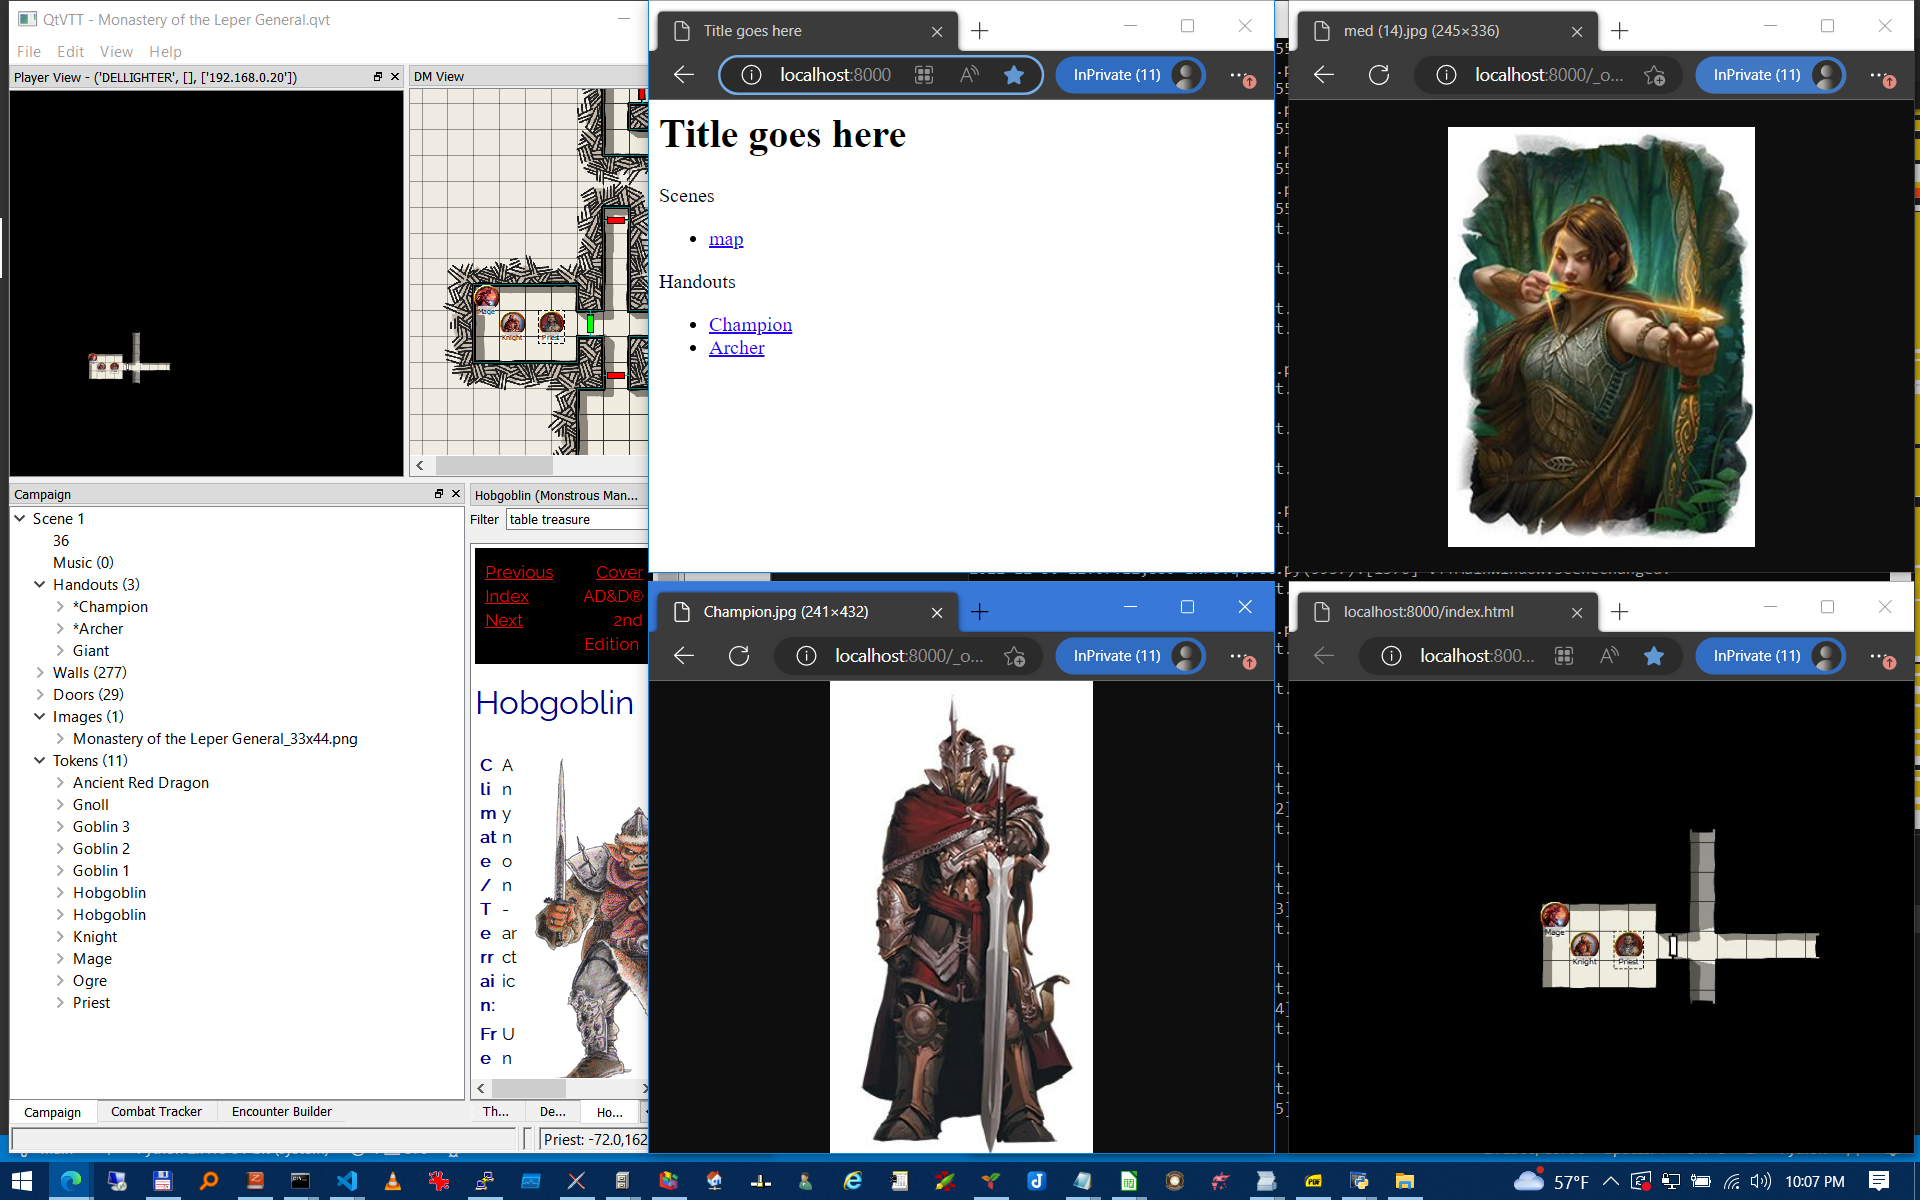
    image

    Shared and private handouts

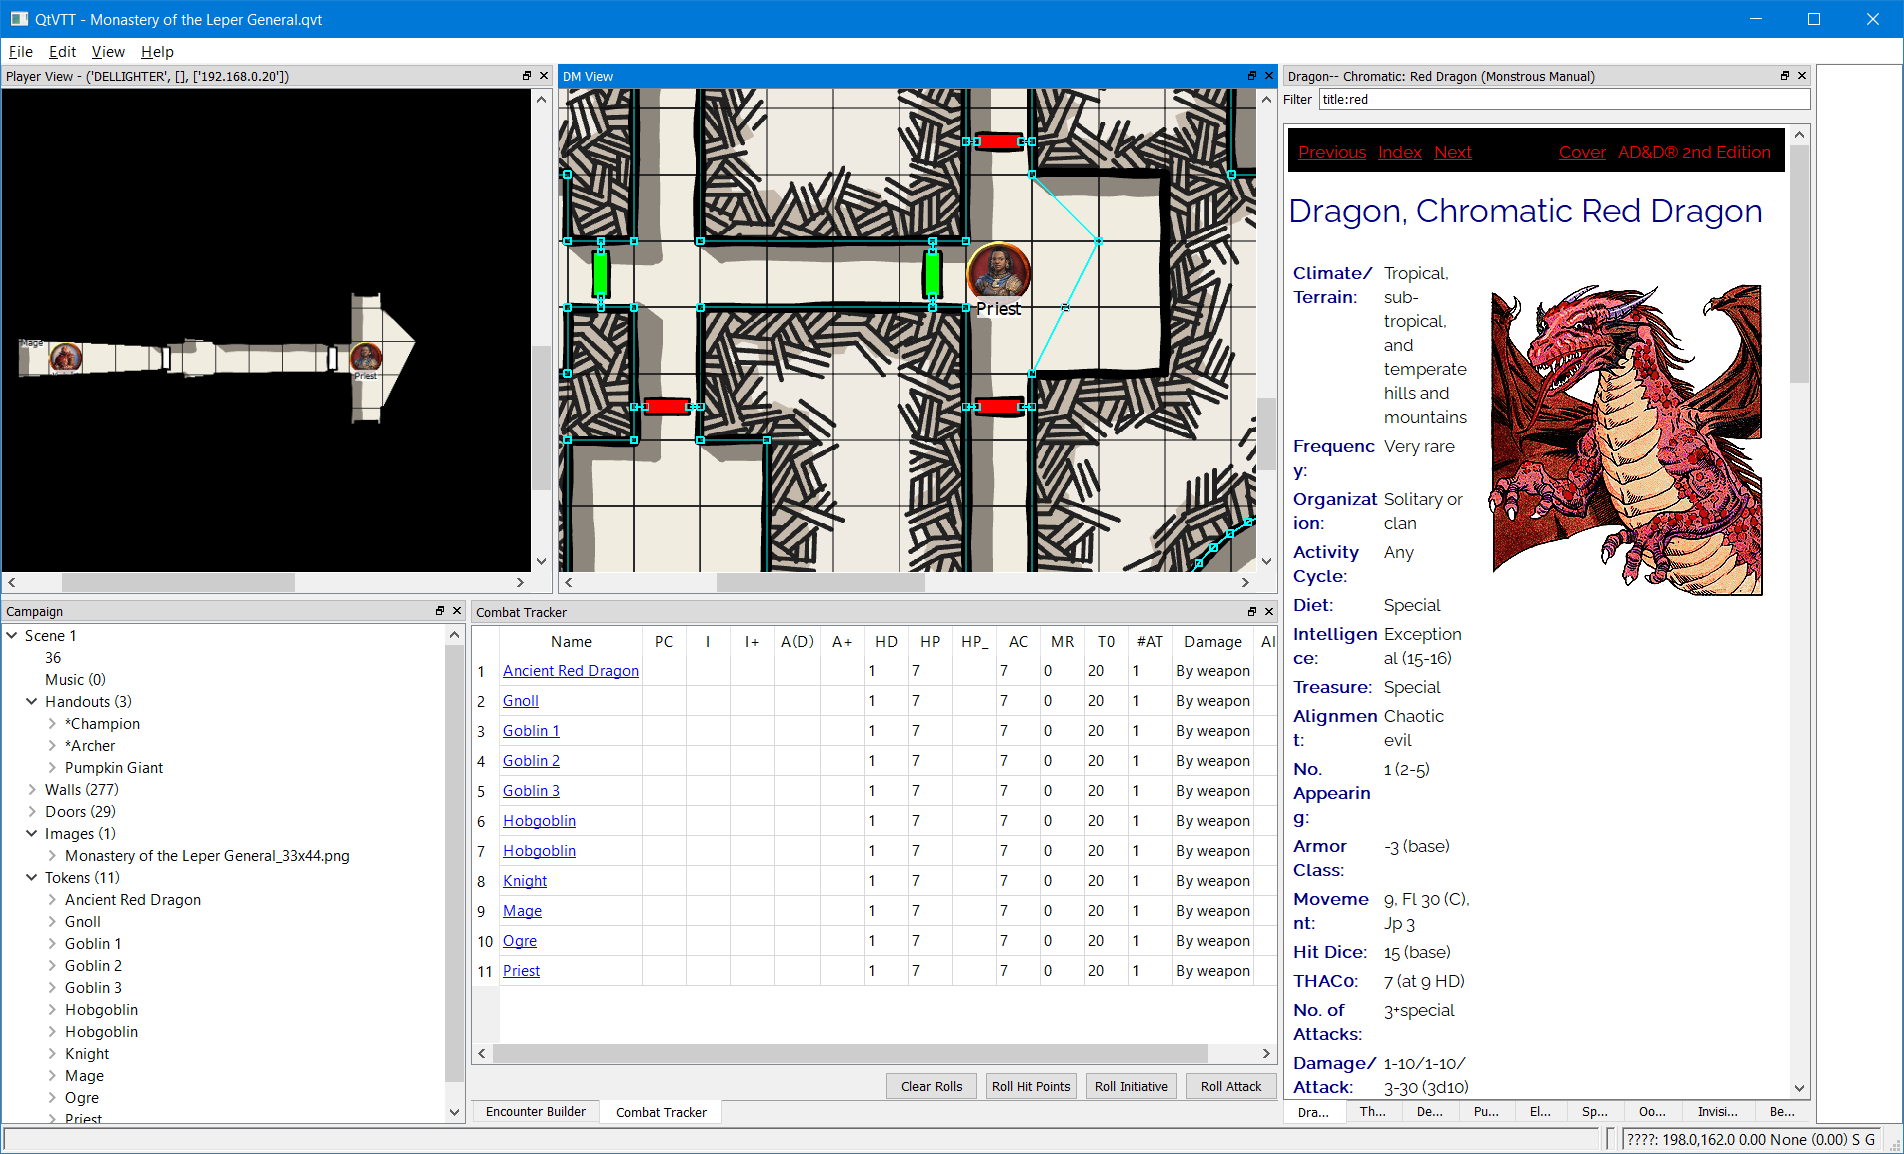
    image

    Editable walls

    image

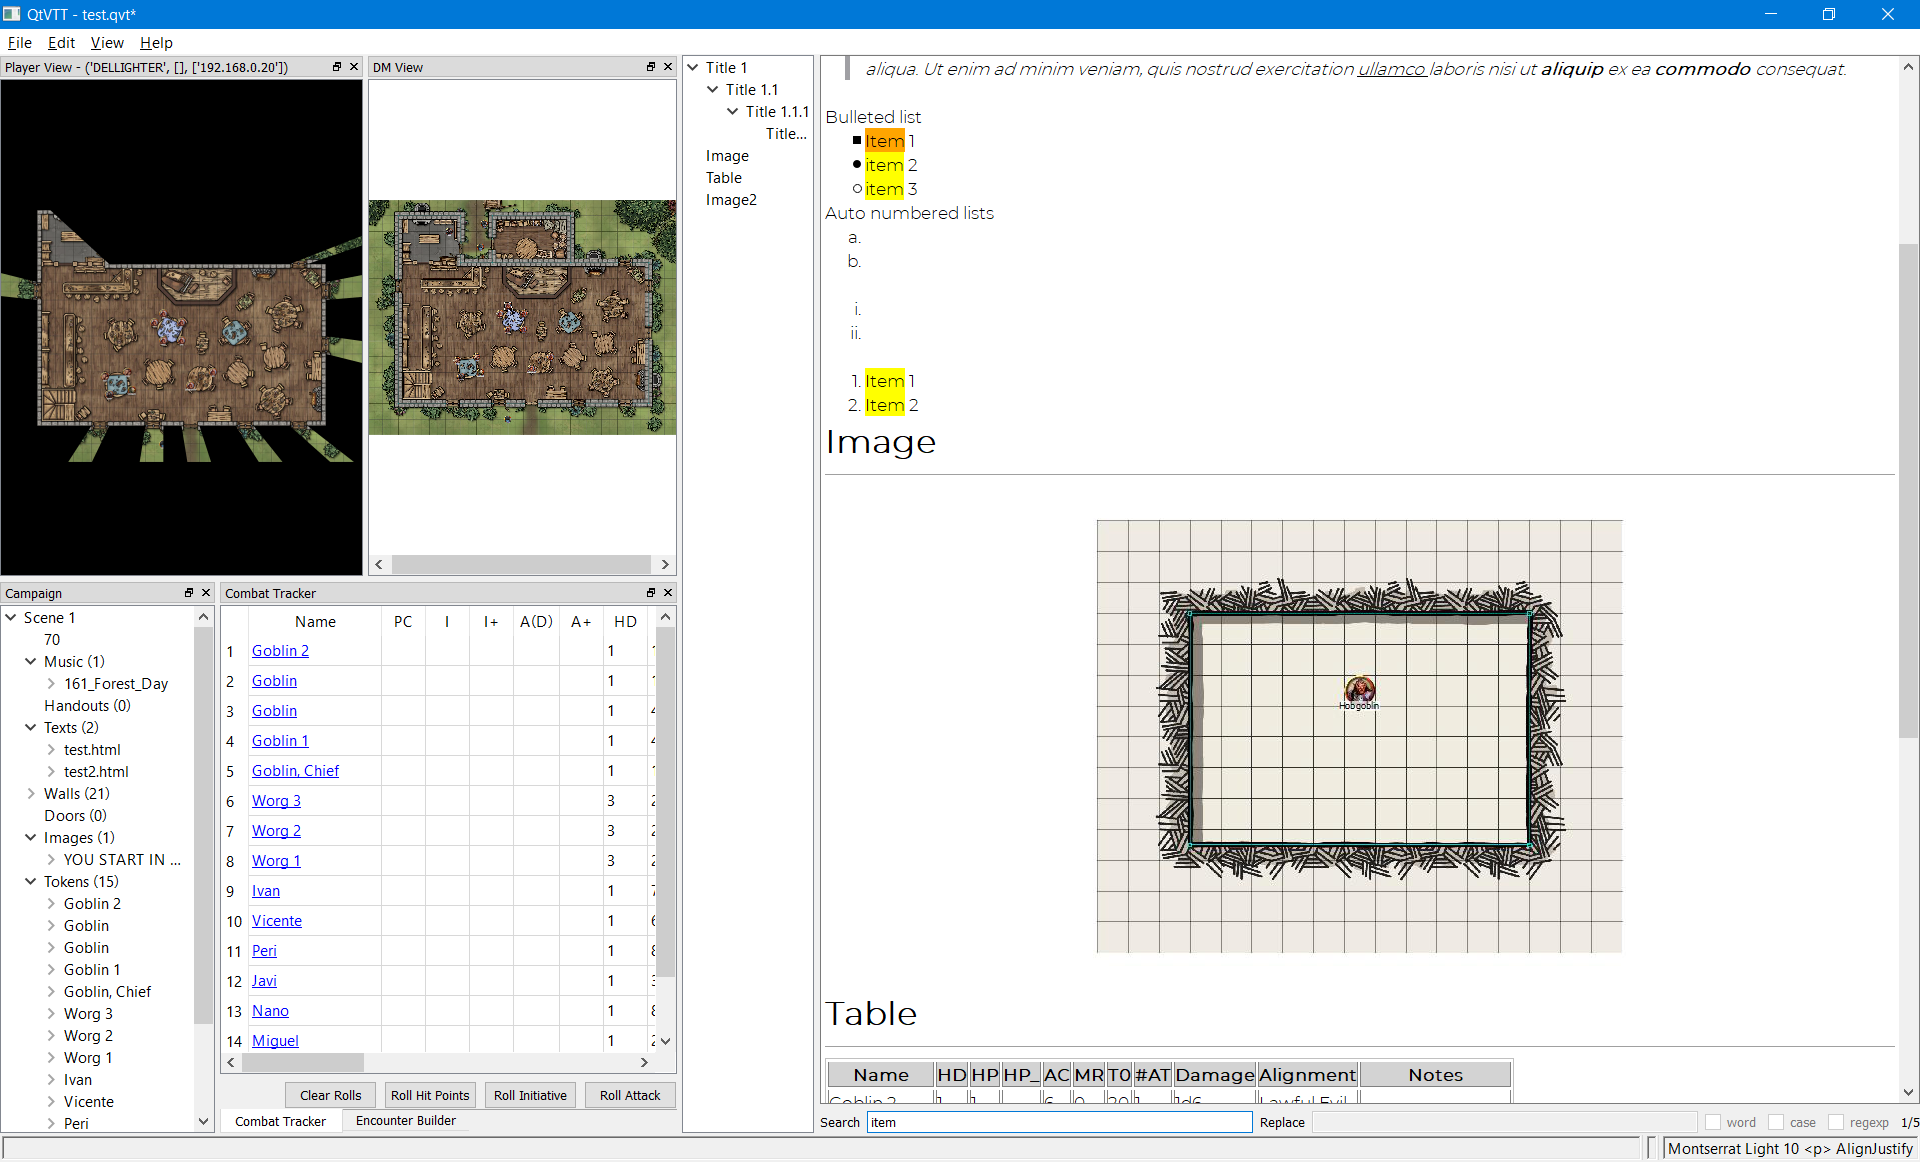
    Text Editor with outline, search, blockquote, text formats, headings, lists, image, table

    image

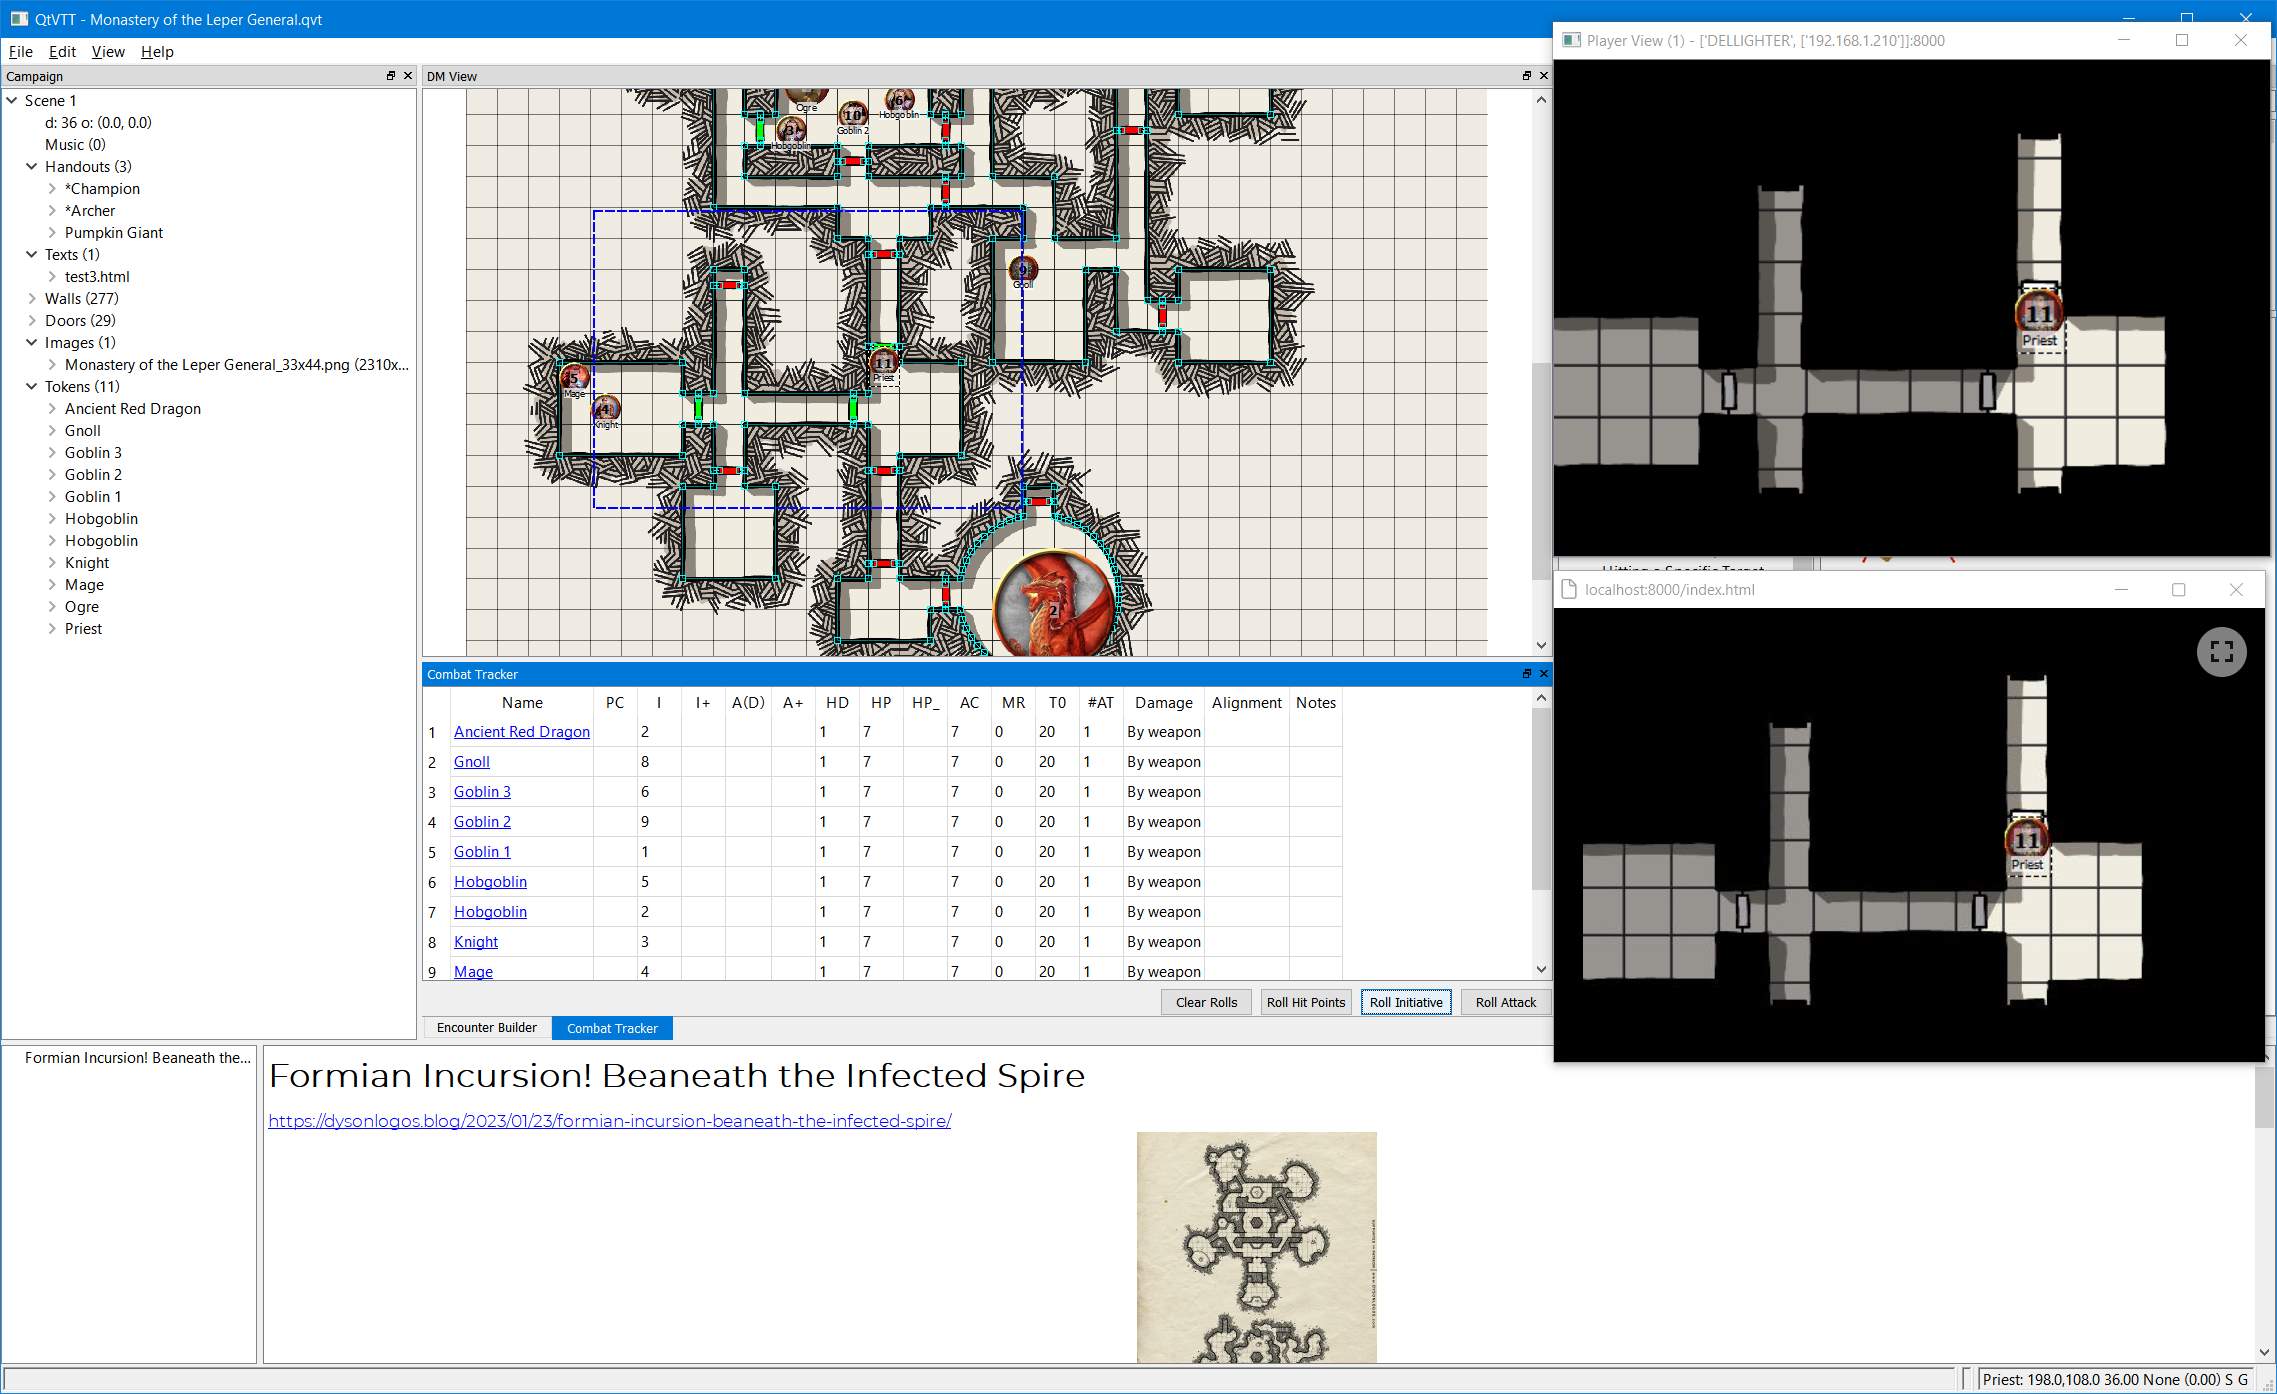
    Playerviewport synchronized to the player view, remote view in edge app mode

    image

    One familiar setting with encounters, combat tracker, and manually added doors and walls

    image

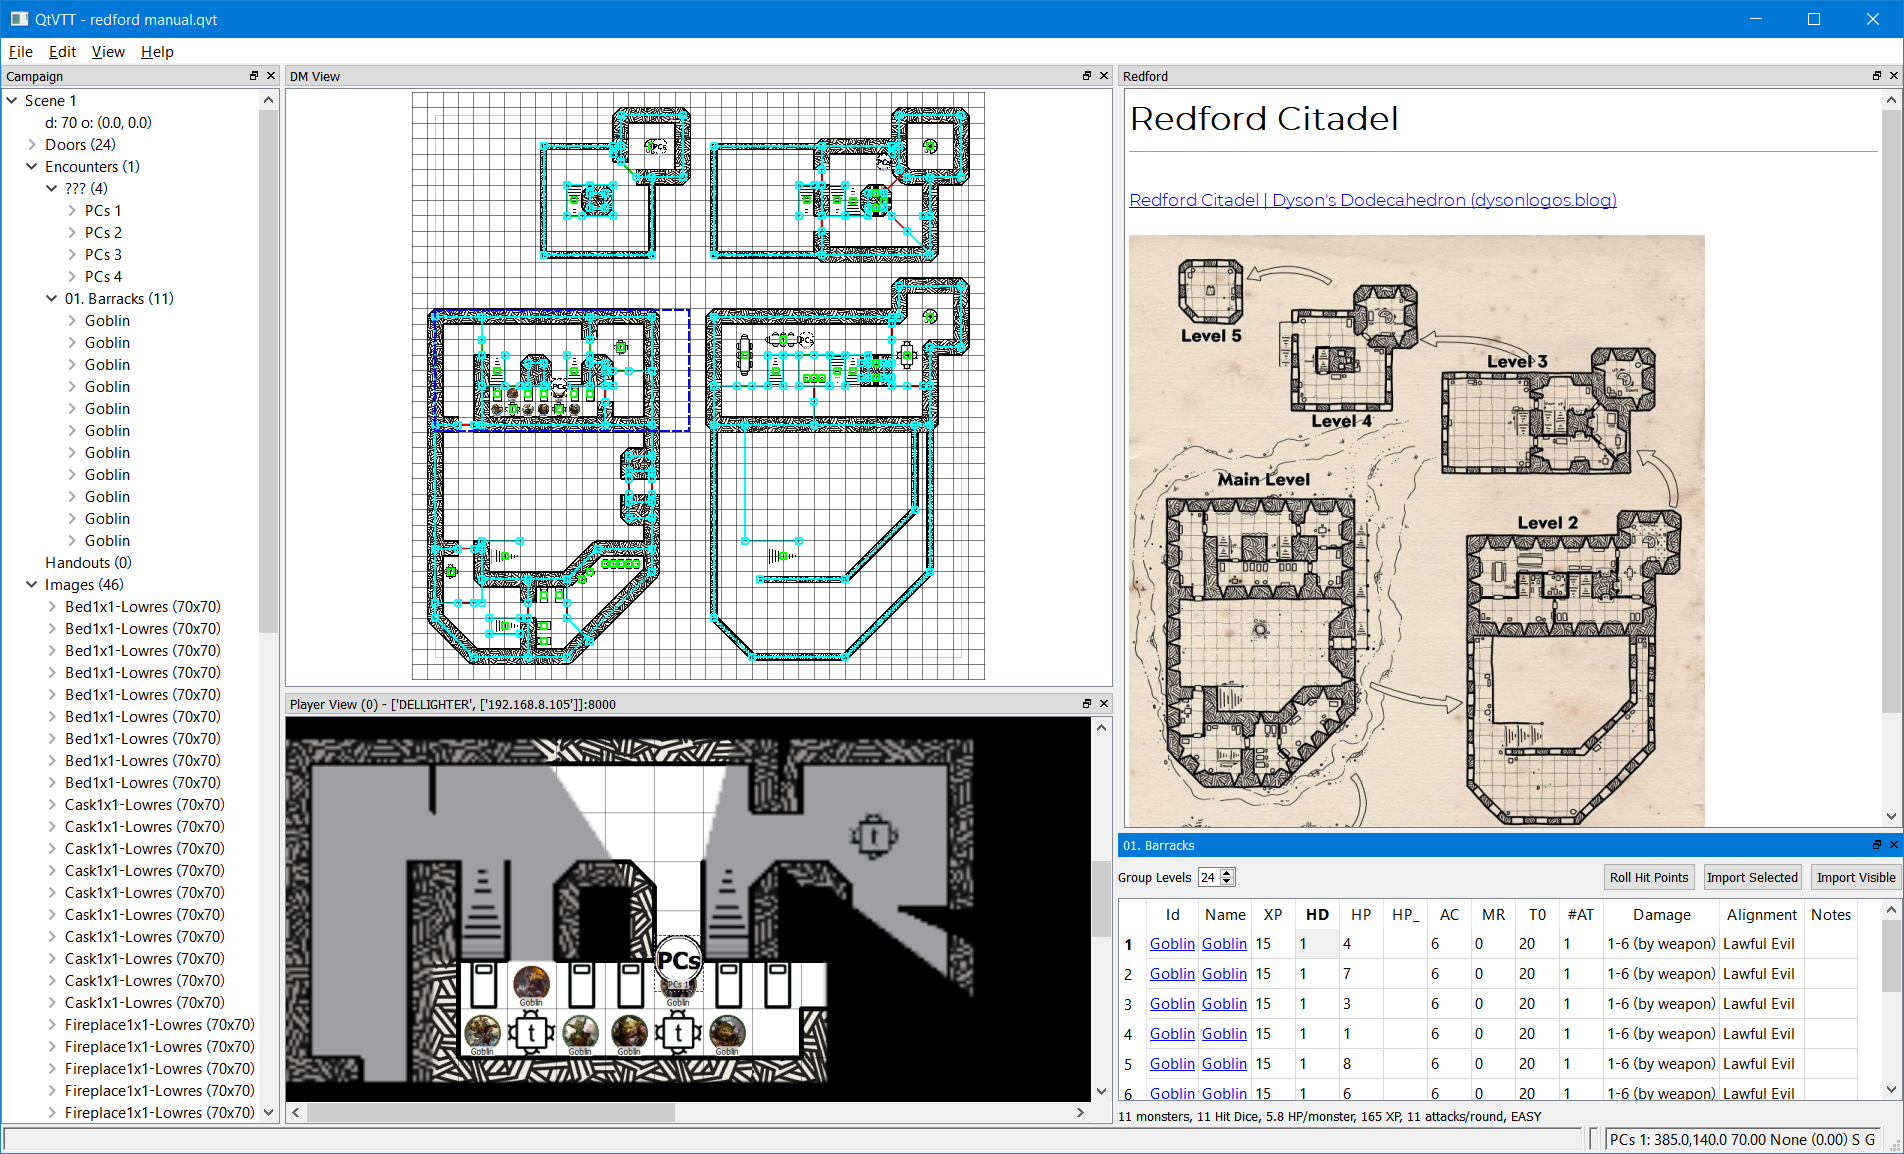
    Manually recreated Dyson Logos map using textured walls and Mark Gosbell classic symbols

    image

    Videos

    Initial line of sight test

    QtVTT.2022-11-28.22-01-31_rescaled.mp4

    Dungeown Scrawl v2 map imported from One Page Dungeon by Watabou, with doors as walls, player and DM views, line of sight, and line of sight debugging.

    Multiple tokens, wall & door collisions, walking around opening doors

    QtVTT.2022-12-01.15-21-50_rescaled.mp4

    Scene creation, token resizing, token labeling, circular walls, documentation browsing, encounter builder, combat tracker

    QtVTT.2022-12-20.12-25-15_rescaled_cut.mp4

    Line of sight, fog of war, light range

    QtVTT.-.Monastery.of.the.Leper.General.qvt.2022-12-27.03-00-41_rescaled.mp4

    Setting up walls fron scratch, editing walls to add openings

    QtVTT.2023-01-21.15-03-53_rescaled.mp4

    Automatic wall creation

    QtVTT.-.autowall.qvt.2023-01-30.01-22-19_rescaled.mp4

    Open Dyson Logos page and automatic wall creation

    QtVTT.2023-02-06.16-56-04_rescaled.mp4

    Features

    • Written in Python and using PyQt, some HTML and SVG for the HTTP serving player’s view.

    Main app

    • Import Dungeon Scrawl v1 and v2 maps with walls and doors
    • Load tokens
    • Move tokens with mouse or keyboard
    • Line of sight display any token
    • Wall and door collision detection for any token
    • Door opening/closing with proper line of sight recalculation
    • Player view with line of sight, exported via http (see http server)
    • Dockable windows for multiple monitor support
    • Player view resolution independent from DM resolution
    • Per scene music playlist
    • HTML Browser
    • Scene tree window
    • Creating, loading and saving scenes
    • Importing images, tokens, music, handouts, texts
    • Deleting tokens, images, walls, doors, music, handouts, texts
    • Cut, copy, and paste selected tokens, images, walls
    • Multiple item selection via rubberband
    • Move/scale images, tokens
    • Textured and variable-width visible walls
    • Select point on single click, full wall on double click (so it can be deleted, moved, etc wholesale)
    • Editing token labels
    • DM fulll and view screenshots
    • HTML documentation browser with quick filter, table of contents and search result navigation intra and inter documents
    • Grid drawing
    • Snap to grid
    • Clip line of sight to different light ranges (candles, torches, etc)
    • AD&D2E Encounter Builder with difficulty rating and importing into the current scene, filter monsters and add them as tokens to the current scene.
    • AD&D2E Combat tracker for rolling initiative, hit points, attacks, damages for the tokens in the current scene.
    • Encounter management: Store multiple encounters in scenes, edit via encounter builder, add encounter to combat tracker, add/drag/copy&paste other tokens to combat tracker
    • Fog of war, show faded visited areas
    • Token tooltips with hit points, AC, THAC0, etc
    • Token center label with initiative order
    • Shared and private handouts
    • Create and edit walls, add points after a given point, remove a point, split wall in two, remove empty walls
    • Edit doors by turning into walls back and forth
    • Text editor for adventure script, with realtime table of contents, search, (some) markdown tag and keyboard shortcut formatting support, tables, and images.
    • Intuitive grid cell size and origin setting
    • Automatic wall creation via contour detection
    • Open Dyson Logos page as campaign (eg https://dysonlogos.blog/2022/01/08/heart-of-darkling-frog-tower/ )
    • Show player viewport on DM view, synchronize to player’s and remote views

    HTTP server

    • Visualize player’s view with line of sight
    • Periodic image autorefresh
    • Normal/Fullscreen
    • Draggable tokens with labels (just dummy for now, not sync’ed with the server)
    • SVG or HTML
    • Main page with available player views, handouts
    • Serve handouts

    Requirements

    • Python 2.7
    • PyQt5
    • numpy (wall detection disabled otherwise)

    Installation

    • Won’t work as is yet, will fail to run due to missing (copyrighted) AD&D 2E data files, and hardcoded asset (fonts, default token…) and saving directory structure.
    • Shouldn’t be hard to hack to run with few changes, but functionality dependent on those AD&D 2E data files will fail (Documentation Browser, Encounter Builder, Combat Tracker…)

    Todo

    Main app

    • Add sample scenes
    • Don’t hard-code documentation/ abstract it out in rulesets/load documentation menu
    • Import Universal VTT (Dungeondraft)
    • Import .mod/.pak (Fantasy grounds)
    • Invisible walls: the wall hides the tokens behind but without “fog” (eg to make hiding in trees/bushes less obvious)
    • Window walls: the wall allows line of sight through but collides like a solid wall
    • Support animated tokens/images (maps) in mp4, webm, gif, etc (eg see https://dynamicdungeons.com/). Will need the http client to receive the map and tokens/viz separately (also, record animated videos from DungeonDraft or Fantasy Grounds Unity using eg XBOX game bar)
    • Use backfacing lines to project the fog, should give a more natural fog for trees, terrain, etc?
    • Export to Dungeon Scrawl for re-rendering (even re-render under the hood?)
    • Music objects, area, fading in / out, shuffle, ordered (see https://tabletopaudio.com/, https://www.youtube.com/@bardify)
    • Hide/Show objects (secret doors, one way walls, secret areas, fogged areas, etc)
    • Label objects for text on maps (can work around by using tokens of numbers for just numbers or the label of transparent tokens? Would need DM-only tag or hide it but without too much fading?)
    • Layers, groups, stack objects up/down
    • Light sources and illumination/flickering/animated lights
    • Multiple floors support
    • Image/token browser
    • Shared pointers and ephemeral drawing
    • Wall, door, token, image, drawing, fog zone, creation/deletion
    • Permanent drawing (spell areas, fire splash, game-clock timer areas, grids, areas of fog of war, etc)
    • Measurement tools (cone, circle, line, square)
    • Token states/stats/heading (stunned, game-clock timers, etc)
    • Campaign/scenes management
    • Copy paste of any object
    • Cross links/embedded tools in text editor (scenes, random tables, monsters, etc)
    • Markdown text import/edit
    • Undo/redo
    • Record playing/combat history
    • Dice rolling
    • Token designer (import any image, rotate, scale, tint, circle cut and draw ring)
    • AD&D2E spell browser
    • AD&D2E Treasure generator
    • AD&D2E Nested random tables
    • AD&D2E character sheets
    • AD&D2E character creation
    • AD&D2E Party tracker (inventory, weight, treasure splitter…)
    • Record audio of local app (allow transcript? test with bluetooth micro?)
    • Record video of local app and/or server UI
    • Chat
    • Video
    • 3D View with miniatures on flat or 3D map (top, ortho)
    • Vector Editor (layers, blends, assets, etc)
    • Send shared view via dirty rects

    HTTP Server

    • Local pointer/ephemeral drawing for signaling, etc
    • Local distance measuring
    • Local panning/zooming (won’t work for 3D view/will require webgl)
    • Local token label/stats drawing for better text clarity
    • Local token roster drawing for initiative visualization, current turn, etc
    • Local token moving/dragging (no NPCs unless it’s a DM view? no viz updates? approve movements? local render of shadow tokens with original positions?)
    • Local grid drawing
    • Local drawing for lighter bandwidth (send background, tokens, fog polygons – may be insecure and incompatible with 3d view)
    • Animated maps by pulling the mp4/webm and drawing on top
    • Per-player player view
    • Send current music (data url or fetched from http server)
    • Character sheet sharing (per player)
    • Chat
    • Video
    Visit original content creator repository https://github.com/antoniotejada/QtVTT
  • reddit-windows-app

    reddit-windows-app

    This app is compatible with windows 10 and 11.

    Screenshots:

    Lock-screen:

    Main-menu:

    Settings:

    Reddit look:

    Using:

    The application will not ask for a password when you first login, if you want to set a password, click the settings icon in the main menu. Just click the GO REDDIT button to go to reddit, you cannot return to the main menu after going to reddit, you must restart the application to access the main menu again, the application will enter the main menu every time it is opened. More in the FAQ.

    Download app:

    There are two options for installation: download .exe and run it directly or download .msi and install it on your computer. If you install it on your computer with .msi, the application will appear in the start menu and control panel, you can uninstall the application from the control panel if you want.
    Download executable-file-.exe
    Download setup-file-.msi

    FAQ:

    How to on lock screen? :
    Go to the settings by clicking on the settings icon on the main page, then turn on the password protection button, set a password, it will now ask for the password you have set every time you log in to the application.
    I forgot my lock screen password, what should I do? :
    Delete the user/appdata/local/sunaipa.reddit folder, this will clear all app settings, your lock screen password and log you out of reddit account.
    What does reset in settings do? :
    This feature will delete your selected background and password, but will not log you out of reddit!!!
    How to change background? :
    Go to settings, set background from settings, you can choose one of the two backgrounds that come by default or you can set your own background URL, the application will open with the background you selected every time it is opened.
    Where is my data stored? :
    All your data is stored locally in the user/appdata/local/sunaipa.reddit folder, if you delete this folder your reddit session will be logged out and the application will return to its factory settings.
    Which systems is the app compatible with? :
    The application runs on Windows operating systems that support Microsoft edge webview2.
    The application does not open, what should I do? :
    Make sure you have Microsoft Edge WebView2 installed on your computer.
    To install Edge Webview2 if not installed: https://developer.microsoft.com/en-us/microsoft-edge/webview2/
    What was the application developed with? :
    The application is developed with the tauri framework. More about Tauri…
    !!!IMPORTANT: For any copyright issues contact sunaipa@duck.com or this github account.
    Visit original content creator repository https://github.com/sunaipa5/reddit-windows-app
  • stunning-disco

    Stunning-Disco

    A web based cross platform music playlist sharing application.

    Inspiration

    Wanted to share a few cult classic rock songs from the good old 60’s, but I am on platform X and my friend on platform Y. So tried serching if there is/are any application(s) to help with this… several google searches later I found few applications which would help me solve my problem.

    While being different applications they all had one thing in common, they all wanted my money at some point or the other.

    I don’t judge people for what they do, but I couldn’t look past this one, of all the sinful things this world is accused of, making money around sharing music and spreading love is just despicable.

    Hence this application, a place to bring all your playlists, albums, favourites from all the major streaming platforms and have the ability to either replicate the same playlist on anyother platform for the same user or be able to share with different users.

    Linus Torvalds: “Software is like sex: it’s better when it’s free.”

    If the creator of Linux and Git feels that, who am I or you to think otherwise.

    Local Setup && Contribution

    If you feel like contributing, fork this repository, clone the forked repository locally.

    Backend/Server setup

    Navigate to the /api folder and from terminal where you cloned the repo locally, first head to the api folder and do npm i or npm install wait for the dependencies to download, upon completion, do npm start

    Frontend/Client setup

    Navigate out of /api folder and navigate to /client folder, and repeat the same steps, start by downloading all the dependecies, npm i or npm install, once done, npm start

    Following the above steps you should have the repo running locally, feel free to propose fetures, fix bugs if you happen to find any or if you think something could have been done better.

    Steve Jobs: After all, we are nothing more or less than the quality of our open source code contribution.

    Linus Torvalds: In real open source software, you have the right to control your own destiny.

    Steve Jobs: Sometimes when you innovate, you make mistakes. It is best to admit them quickly, and get on with improving your other innovations.

    Visit original content creator repository
    https://github.com/sirdarthvader/stunning-disco

  • ImageRiddleSolving

    Solving Image Riddles

    This repository contains the code with respect to the results presented in Answering Image Riddles using Vision and Reasoning through Probabilistic Soft Logic. The updated
    version of this work is accepted in UAI 2018 (Title: Combining Knowledge and Reasoning through Probabilistic Soft Logic for Image Puzzle Solving).

    Pre-requisities

    • Create a python virtual-environment, activate it and install packages using the provided requirements.txt.
    • In the same virtual environment, follow the instructions in conceptnet_setup_script.sh to set up ConceptNet5 and its association-space matrix version.

    Riddles Dataset: Pre-Processing

    All Seed Collection from Clarifai Files

    • Follow the following steps to store the ground-truth names of the riddles in a file.
      • python findFiles.py $ARG0 > $OP0
      • copy the file $OP0 to $ARG0
      • copy seeds.sh to $ARG0
      • execute ./seeds.sh $OP0

    Directories SETUP:

    1. conceptnet_util.py requires:
      • The association-space representation of ConceptNet 5: ../conceptnet5/data/assoc/assoc-space-5.4
      • Word-Vectors trained on Google News corpus: ../../../DATASETS/GoogleNews-vectors-negative300.bin
    2. mergeTargets.py Requires the following directory setup.

    intermediateFiles/allTargets/test1/;
    |
    |_aardvark__targets__sorted.txt
    |_aardvark__targets_.txt
    |_...
    

    Targets Pre-processing for Fast ConceptNet access:

    Firing ConceptNet queries for each word for each image in a riddle is quiet expensive in terms of running time. Hence, we pre-process
    and store the most similar targets for each ground-truth answer in the riddles dataset.

    1. Base Form Creation: To create the base forms, run:

    python preprocess/targetsFileBaseWords.py ../First250riddles/riddlesDetectionAll/seeds3333_for_conceptnet.txt > intermediateFiles/lemmatizedSeeds_all3k.txt
    python preprocess/EigenvectorCentrality.py intermediateFiles/lemmatizedSeeds_all3k.txt > intermediateFiles/lemmatizedSeedsCentralized_all3k.txt
    
    1. Then Sort Suggested Targets:
     .scripts/sortSuggestedTargets.sh intermediateFiles/allTargets/test1
    

    Run Inference

    1. For ResidualNetwork detections, run:

    python testAllStagesGUR.py intermediateFiles/lemmatizedSeedsCentralizedResNet_3k.txt ../First250riddles/riddlesDetectionAll/ 3333
    <outputFolder> resnet -stage all
    
    1. For Clarifai detections, run:

    python testAllStagesGUR.py intermediateFiles/lemmatizedSeedsCentralizedResNet_3k.txt ../First250riddles/riddlesDetectionAll/ 3333  <outputFolder> clarifai -stage all
    usage: testAllStagesGUR.py [-h] [-stage STAGE] [-from FROM] [-to TO]
                               [-par PAR]
                               seedsCentralityfile detectionsFolder numPuzzles
                               inferenceFolder {clarifai,resnet}
    STAGE: all/merge/clarifai
    

    Choose stage as all for running the entire pipeline, clarifai for running the greedy solution upto visual detections and merge for running upto rank and retrieve stage.

    1. For running UR and IUR (termed as BUR in paper) variants, just use testAllStagesUR.py and testAllStagesIUR.py respectively.

    Calculating Post-Run Accuracy:

    usage: postrun/calculatePostRunAccuracy.py [-h] [-cleanup CLEANUP]
                                       [-summaryFile SUMMARYFILE]
                                       [-ignoreDevDataFile IGNOREDEVDATAFILE]
                                       inferenceFolder maxOrAvg
    python postrun/calculatePostRunAccuracy.py intermediateFiles/resnet/output_iur_merge_pc1_r/ max -ignoreDevDataFile
    

    Gitlab Commit:

    git status
    git add *.py
    git commit -m "pushing riddle code" *.py
    git push -u origin master
    

    Author Affiliation:

    The code is developed by Somak Aditya, when he was working as a Graduate Research Assistant in Prof. Chitta Baral’s lab
    at CIDSE, Arizona State Univerisity.

    Disclaimer

    This is one of the first python-based software I wrote. So, a complete overhaul is required to increase the readability of the code.
    However, given the pre-processing steps are done correctly, this code should be used to re-produce the results presented in the Image Riddle paper.

    Visit original content creator repository
    https://github.com/adityaSomak/ImageRiddleSolving

  • express-ts-template

    express-knex-typescript-template

    A template that can be used to quickly scaffold a project based on express, knex and typescript.

    Buzzwords …or… What technologies does this project use:

    • Docker: Linux container runtime
    • PostgreSQL: SQL Database
    • Knexjs: Query Builder library
    • Mocha & Chai: Testing libraries
    • Nodemon: Node process watcher/restarter for fast development
    • TypeScript: JavaScript + Types = <3
    • Pug: HTML/XML/Plain Text Template engine
    • ESLint: linting library that enforces code style
    • Express: HTTP server library that provides a middleware-based architecture
    • BullMQ: Job Queue management library
    • Redis: In-Memory store used by BullMQ
    • JWT: Json Web Tokens used for authorization/authentication purposes
    • dotenv: library that imports environment variables from a .env file
    • Morgan & Winston: Logging middleware and library
    • bcrypt: cryptographic library used for hashing

    If you’re comfortable testing it, you own it, start by reading tests in the project.

    Setup

    Clone the project:

    git clone https://github.com/shalior/express-ts-template.git
    cd express-ts-template
    npm i
    npm run setup
    

    This app reads its environment variables from a .env file, a .env.example is provided.
    The npm run setup command will copy the content of the .env.example and replace the SECRET variable with a cryptographically-safe random string.
    Moreover, the setup script will also rename the package name in both package.json and package-lock.json

    Note: never add the .env file to git or any other version control system. It’s meant to be a local file with custom configurations relative to the machine where the app runs

    npm run …

    This template provides a set of useful scripts that can be called using the npm run <script> syntax.
    These scripts are:
    Normally you’ll run these with my docker helper script (nail) like nail npm run build

    • knex: knex cli wrapper that runs dotenv/config before instantiating knex
    • test: tests the application using mocha and chai
    • build: runs the typescript compiler to build your application
    • prestart: runs all the pending migration before the start script using the migrate-nobuild script
    • start: starts a node process that will execute this package
    • dev: starts nodemon in watch mode, this way you can edit your source ts files without having to rebuild and restart the application manually
    • lint: runs eslint
    • lint:fix: runs eslint with the –fix flag
    • migrate: builds the project and runs all the migrations under src/db/migrations
    • migrate-nobuild: runs all the migrations under src/db/migrations
    • rollback:all: builds the project and rollbacks all the migrations under src/db/migrations
    • refresh:seed: rollback all migration and run seeders.
    • seed: builds the project and runs all the seeds under src/db/seeds
    • migrate-seed: migrates and seeds, without building twice
    • setup: runs the setup.js script described below

    docker

    The docker-compose.yml file is intented to be used in development, It has images for node postgres and redis.
    to interact with containers use the nail helper like so:

    • docker compose up -d: spin up docker compose
    • nail npm run build: runs build script inside container using node image
    • nail test:all: runs all tests
    • nail mocha --grep="keyword" to run specific set of tests

    nail has other useful commands like: nail psql , nail shell and others, for a complete list look at the source code.

    What’s next

    If you look for the word TODO in this project you’ll find some places where your intervention could be needed to better fit the needs of your new project. Feel free to
    modify anything you want!


    This project is a maintained and enhanced fork of express-knex-typescript-template

    Visit original content creator repository
    https://github.com/shalior/express-ts-template

  • minus-compiler

    C- Compiler

    This repository contains a compiler for the C- language written for the Compilers course offered at the University of Guelph (CIS4650) in Winter 2017.

    Browse this repository at your own risk if you are taking this course. I do not recommend copying anything from here verbatim as this is not a perfect solution.
    There are quite a few errors in this code (especially in the generation of assembly code).

    Authors

    • Neivin Mathew
    • Braydon Johnson

    Building the Project

    To build the program, simply navigate to the directory that this README is located in and run ‘make’

    Note: The program requires CUP, whose location should be added to the Java classpath in the Makefile. Currently, it is set to:

    CLASSPATH=-classpath /usr/share/java/cup.jar:.
    

    Run make clean to delete all build files.

    Running the Project

    To run the project, first build it by running make.
    Then, run the following command, substituting the CUP classpath for
    the location of CUP on your machine:

    java -classpath /usr/share/java/cup.jar:. CM input.cm
    

    To print out the Abstract Syntax Tree, use the command line option -a:

    java -classpath /usr/share/java/cup.jar:. CM -a input.cm
    

    To print out the Symbol Table that is generated when parsing, use the
    command line option -s:

    java -classpath /usr/share/java/cup.jar:. CM -s input.cm
    

    To generate the Assembly code, use the command line option -c:

    java -classpath /usr/share/java/cup.jar:. CM -c input.cm
    

    Testing

    Ten test files: [1234567890].cm are included in the test directory.
    [1234].cm will compile properly without errors and can generate
    assembly code.

    [567890].cm contain multiple syntax and semantic errors and will
    not generate assembly code.

    They can be executed by running the above commands from the previous
    section on the test files.

    Acknowledgements

    For this checkpoint, we built upon our work from Checkpoint One and Two.

    For the first checkpoint we used Professor Fei Song’s provided code
    as a starting point to build the project. We also followed the
    recommended syntax tree structures for the C- language from the course
    slides.

    Visit original content creator repository
    https://github.com/neivin/minus-compiler

  • pulseaudio-module-xrdp

    Build Status Gitter (xrdp)

    Overview

    xrdp implements Audio Output redirection using PulseAudio, which is a sound system used on POSIX operating systems.

    The server to client audio redirection is implemented as per Remote Desktop Protocol: Audio Output Virtual Channel Extension [MS-RDPEA] specs, which means it is interoperable with any RDP client which implements it (most of them including: MS RDP clients, FreeRDP).

    The client to server audio redirection is implemented as per Remote Desktop Protocol: Audio Input Redirection Virtual Channel Extension [MS-RDPEAI] which means it is interoperable with any RDP client which implements it (most of them including: MS RDP clients, FreeRDP).

    How to build

    These modules make use of the internal pulseaudio module API. To build them you need access to the pulseaudio sources and configuration.

    Be aware that the pulseaudio application development packages provided with many distributions do not contain the files necessary to use the pulseaudio module API. Consequently, the preparation for building these modules can be a little more involved than just installing development tools and packages.

    Consult the Pulseaudio Wiki for instructions on building the modules for your platform:-

    https://github.com/neutrinolabs/pulseaudio-module-xrdp/wiki

    Install

    One the modules have been built, sudo make install should do the following:-

    • Install the modules to the correct directory
    • Install a script load_pa_modules.sh to load the modules when a session is started. On many systems this script is installed by default in /usr/libexec/pulseaudio-module-xrdp/
    • Install a desktop file pulseaudio-xrdp.desktop which will call the load_pa_modules.sh script when a desktop is loaded. On many systems this script is installed by default in /etc/xdg/autostart

    Note that the modules will only be loaded automatically when the desktop starts if your desktop supports the XDG autostart specification. Most modern desktops support this.

    You can confirm if the modules are properly installed by following command:

    ls $(pkg-config --variable=modlibexecdir libpulse) | grep xrdp
    

    If you can see module-xrdp-sink.so and module-xrdp-source.so, PulseAudio modules are properly built and installed.

    Enjoy!

    See if it works

    The easiest way to test this is to use the paplay command to play an audio file.

    You can also do the following:-

    • run pavumeter in the xrdp session-
    • Playback any YouTube video in Firefox.

    You’ll see “Showing signal levels of xrdp sink” and volume meter moving.

    Visit original content creator repository https://github.com/neutrinolabs/pulseaudio-module-xrdp
  • @eatonfyi/clarango

    @eatonfyi/clarango

    CLI tools for ArangoDB

    oclif Version Downloads/week

    Usage

    $ npm install -g @eatonfyi/clarango
    $ clarango COMMAND
    running command...
    $ clarango (--version)
    @eatonfyi/clarango/0.0.0 darwin-arm64 node-v22.5.1
    $ clarango --help [COMMAND]
    USAGE
      $ clarango COMMAND
    ...

    Commands

    clarango backup

    backup the contents of a database

    USAGE
      $ clarango backup [--json] [-d <value>] [-h <value>] [-p <value>] [-s <value>] [-u <value>]
    
    CONNECTION FLAGS
      -d, --databaseName=<value>  Database name
      -h, --host=<value>          Server URL (with port)
      -p, --password=<value>      Server password
      -s, --server=<value>        [default: default] Saved server preset
      -u, --username=<value>      Server username
    
    GLOBAL FLAGS
      --json  Format output as json.
    

    See code: src/commands/backup.ts

    clarango config

    display and manage CLI settings

    USAGE
      $ clarango config [--json] [-d <value>] [-h <value>] [-p <value>] [-s <value>] [-u <value>]
    
    CONNECTION FLAGS
      -d, --databaseName=<value>  Database name
      -h, --host=<value>          Server URL (with port)
      -p, --password=<value>      Server password
      -s, --server=<value>        [default: default] Saved server preset
      -u, --username=<value>      Server username
    
    GLOBAL FLAGS
      --json  Format output as json.
    

    See code: src/commands/config/index.ts

    clarango config edit

    edit config file manually

    USAGE
      $ clarango config edit [--json] [-d <value>] [-h <value>] [-p <value>] [-s <value>] [-u <value>]
    
    CONNECTION FLAGS
      -d, --databaseName=<value>  Database name
      -h, --host=<value>          Server URL (with port)
      -p, --password=<value>      Server password
      -s, --server=<value>        [default: default] Saved server preset
      -u, --username=<value>      Server username
    
    GLOBAL FLAGS
      --json  Format output as json.
    

    See code: src/commands/config/edit.ts

    clarango config remove

    remove settings for a server

    USAGE
      $ clarango config remove [--json] [-d <value>] [-h <value>] [-p <value>] [-s <value>] [-u <value>]
    
    CONNECTION FLAGS
      -d, --databaseName=<value>  Database name
      -h, --host=<value>          Server URL (with port)
      -p, --password=<value>      Server password
      -s, --server=<value>        [default: default] Saved server preset
      -u, --username=<value>      Server username
    
    GLOBAL FLAGS
      --json  Format output as json.
    

    See code: src/commands/config/remove.ts

    clarango config reset

    discard all saved server settings

    USAGE
      $ clarango config reset [--json] [-d <value>] [-h <value>] [-p <value>] [-s <value>] [-u <value>]
    
    CONNECTION FLAGS
      -d, --databaseName=<value>  Database name
      -h, --host=<value>          Server URL (with port)
      -p, --password=<value>      Server password
      -s, --server=<value>        [default: default] Saved server preset
      -u, --username=<value>      Server username
    
    GLOBAL FLAGS
      --json  Format output as json.
    

    See code: src/commands/config/reset.ts

    clarango config set

    add settings for a server

    USAGE
      $ clarango config set [--json] [-d <value>] [-h <value>] [-p <value>] [-s <value>] [-u <value>]
    
    CONNECTION FLAGS
      -d, --databaseName=<value>  Database name
      -h, --host=<value>          Server URL (with port)
      -p, --password=<value>      Server password
      -s, --server=<value>        [default: default] Saved server preset
      -u, --username=<value>      Server username
    
    GLOBAL FLAGS
      --json  Format output as json.
    

    See code: src/commands/config/set.ts

    clarango help [COMMAND]

    Display help for clarango.

    USAGE
      $ clarango help [COMMAND...] [-n]
    
    ARGUMENTS
      COMMAND...  Command to show help for.
    
    FLAGS
      -n, --nested-commands  Include all nested commands in the output.
    
    DESCRIPTION
      Display help for clarango.
    

    See code: @oclif/plugin-help

    clarango info

    display database collections and metadata

    USAGE
      $ clarango info [--json] [-d <value>] [-h <value>] [-p <value>] [-s <value>] [-u <value>]
    
    CONNECTION FLAGS
      -d, --databaseName=<value>  Database name
      -h, --host=<value>          Server URL (with port)
      -p, --password=<value>      Server password
      -s, --server=<value>        [default: default] Saved server preset
      -u, --username=<value>      Server username
    
    GLOBAL FLAGS
      --json  Format output as json.
    

    See code: src/commands/info.ts

    clarango restore

    backup the contents of a database

    USAGE
      $ clarango restore [--json] [-d <value>] [-h <value>] [-p <value>] [-s <value>] [-u <value>]
    
    CONNECTION FLAGS
      -d, --databaseName=<value>  Database name
      -h, --host=<value>          Server URL (with port)
      -p, --password=<value>      Server password
      -s, --server=<value>        [default: default] Saved server preset
      -u, --username=<value>      Server username
    
    GLOBAL FLAGS
      --json  Format output as json.
    

    See code: src/commands/restore.ts

    Visit original content creator repository https://github.com/eaton/clarango